The Transcripts module provides school administrators with a versatile and fully-customizable transcript system, enabling them to configure and display transcript records for students in a variety of grade levels, ranging from Kindergarten to college-bound high school students. Grade point average (GPA) can be calculated using a customizable GPA table, establishing a centralized formula that can be used school-wide. Transcripts may be configured to display a wide range of information, including student biographical and contact data, attendance, subjects taken, grades and credits earned, GPA (both weighted and cumulative), class rank, SAT/ACT scores, and other customizable fields.
This article offers detailed information about how to select and configure different kinds of transcripts, as well as how to access, view, download, and print student transcripts. Features discussed include basic display and access to existing transcripts, configuration of GPA tables, and the use of templates to customize transcripts for your school's specific needs.
- Activating Transcripts Feature
- Accessing Transcripts Tab
- Setting up the Transcript Template
- Configuring Transcripts
- Selecting Transcripts
- View, Edit, and Download transcripts
- Hiding Semesters
- Hiding Subjects
- Resetting Semester Data
- Adding Custom Semesters
- Searching for Inactive Students
Activating Transcripts Feature
To enable Transcripts module: click SETTINGS > Turn Features On/Off > click the Transcripts check box > click Configure link to set up access. You must be subscribed in either the Apollo or Athena plan to have access to the Transcripts feature.
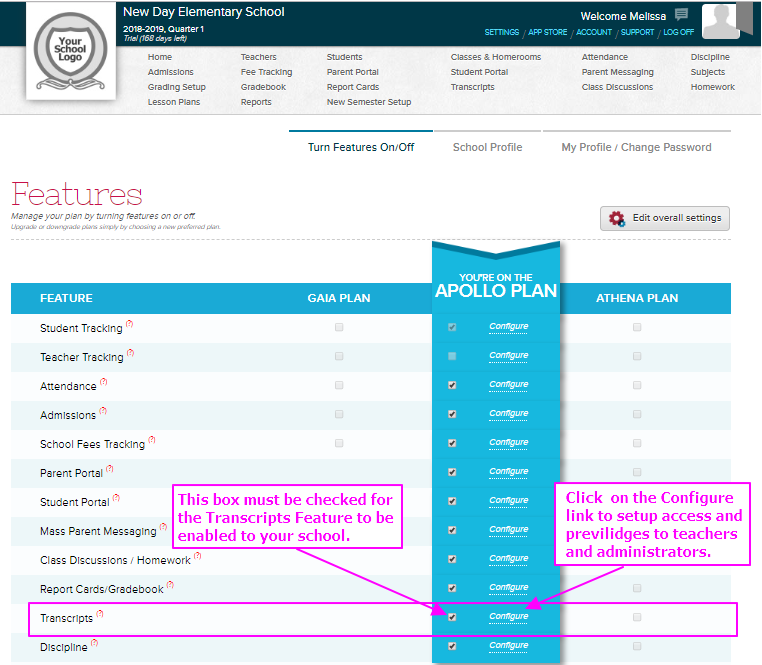
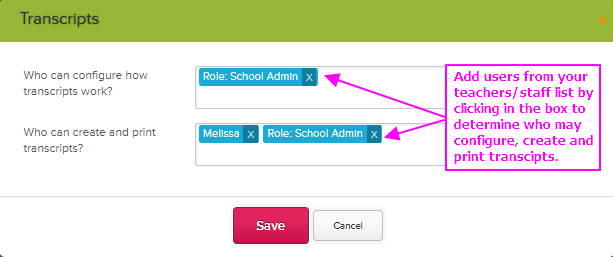
This will bring up a Transcripts popup box in which privileges can be set for school admin or staff in your school. You can designate who in your school may configure, create, and print transcripts. To do so, click in the relevant box and select individual teachers from the drop-down menu, or select All Teachers if you want everyone to be able to access the privilege:
Accessing Transcripts Tab
The Transcripts module contains three menu tabs:
- Transcripts
- Transcripts Configuration
- Template Selection

Setting up the Transcript Template
Before working on the Transcripts, the template must be set up first based on your requirements. From the Template Selection tab, the Basic Transcript template is selected by default.
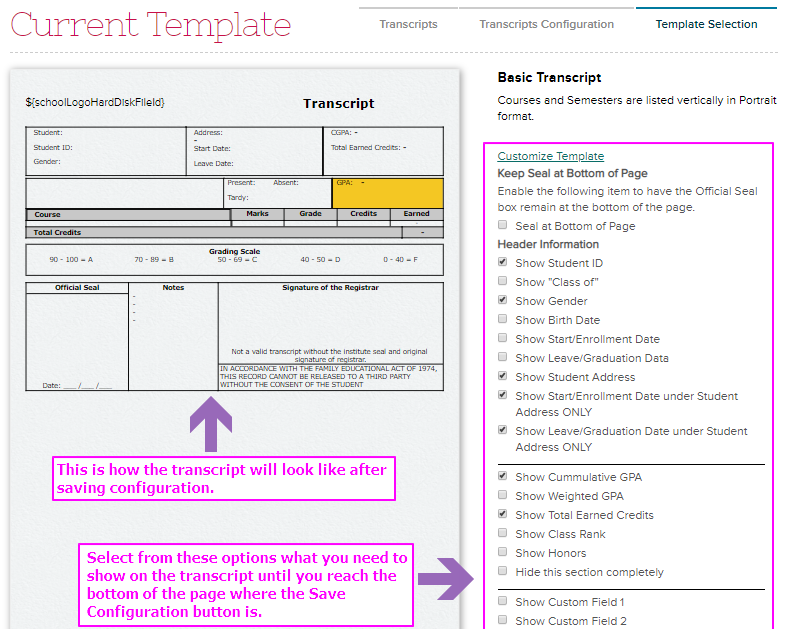
Template Selection page
Other available public templates can be activated by scrolling down the bottom of the page. Click Activate to change the current template.
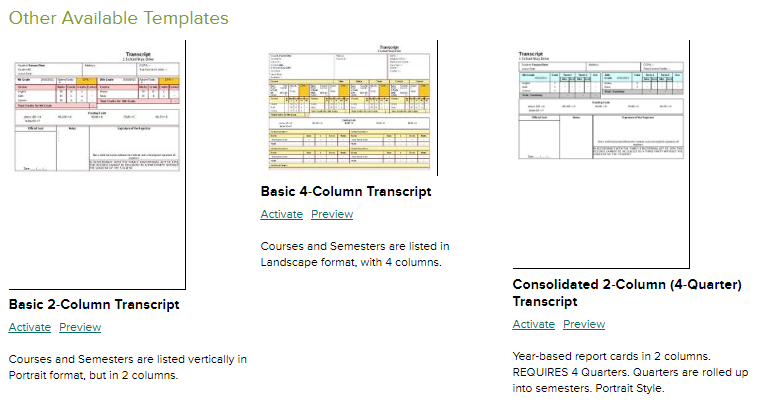
NOTE: Only one template can be activated for all students, unlike report cards where you can select and assign different templates per grade level.
Each template has configuration switches on the right were you can choose which fields to show or hide. Review and change configurations for each of these sections:
- Header - basic student information from student records
- Semester Section - display information like the student’s grade level at that time, semester name, total credits and GPA
- Attendance Section - display fields such as Present, Absent, Tardy, etc.
- Subject Section - hide marks, grades, credits earned, subject names and abbreviations, etc.
- Subject Earned Credit - select if credits should be multiplied or not.
- Grading Scale - display default grading scale and add custom grading scale.
- Weighted GPA - how weighted GPAs are computed
- Custom School Section - add a table to show graduation requirements and status
- Custom Student Section - add a table to show grades for Standard Testing, Awards & Accomplishments, and Discipline, etc.
- Official Seal - select which sections to show like the seal, signature, notes, etc.
After selecting your preferred set up, click the Save Configuration button at the bottom of the page.
If you need to customize the header names, custom grading scale and add school section details, check out Customizing Transcripts.
Just like any other templates, if the available public templates do not fit your needs, we can customize your transcript template with additional fee. Please chat with us or email your request at support@quickschools.com .
Configuring Transcripts
Once you’ve finished setting up the template, move to the Transcript Configuration tab to configure how semesters are shown, GPAs are calculated and select specific grade levels to show on the template.
Basic Configuration
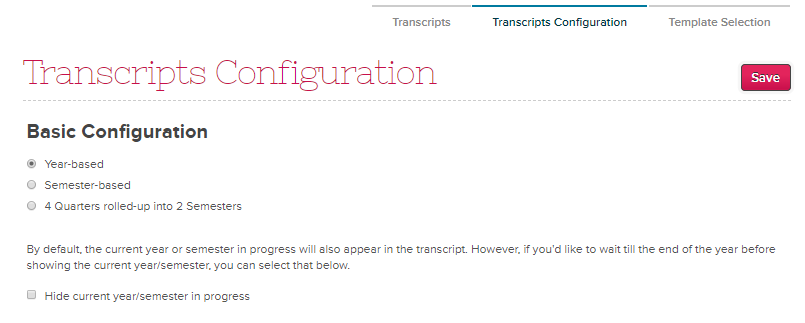
Below is a comparison of the Year-based, Semester-based, and 4-Quarters rolled-up into 2 Semesters using the Basic Transcript Template:
-
Year-based - only one semester table will be shown even if you have multiple semesters in one academic year. The system will automatically average the Final Grade marks from each semester’s gradebook. Subject names are required to have identical names and spelling to avoid duplication of rows and incorrect calculation.
-
Semester-based - show one table per semester.
-
4 Quarters rolled-up in 2 Semesters - Grades are automatically averaged and split into 2 semesters.


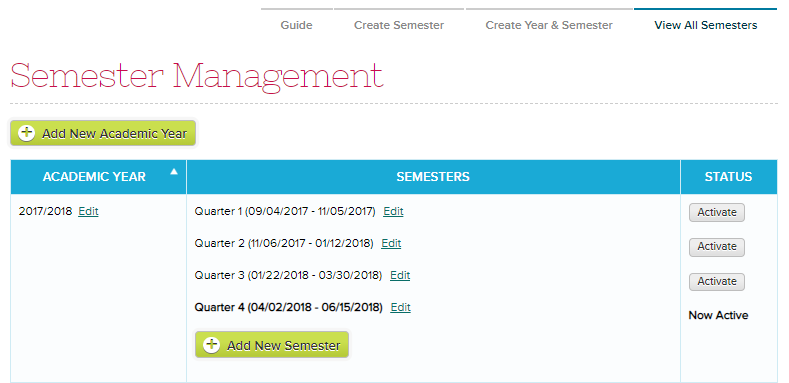
Requires 4 terms per academic year:
You also have the option to hide the current semester if you are using Year-based transcripts since the grades are not yet finalized. To do so, just enable the “Hide current semester/year in progress” then save the configuration.
GPA Table
Set up the GPA points based on the letter grades from the grading scale. If you use multiple grading scales, enter all possible letter grades. Grading scales can be found on the Grading Setup tab from the main menu.

The GPA configuration works on both report cards and transcripts.
Select Grade Levels

If you want to limit the grade levels showing on the student’s transcript, select from the field provided. From the example above, if a student currently in 11th grade was enrolled in school since he was in 5th Grade, all his academic years from 5th to 8th grade will be hidden from the transcript.
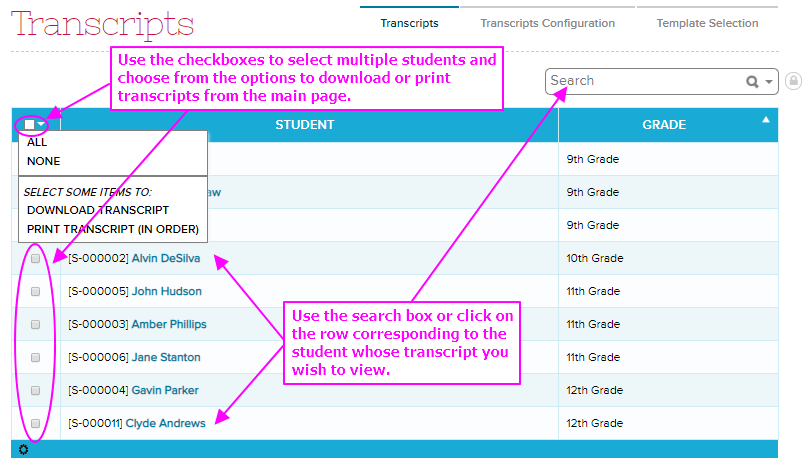
Selecting Transcripts
The Transcripts tab lists all the current active students in alphabetical order or by grade level. Use the check boxes on the left to select multiple students to print or download transcripts in bulk.
View, Edit, and Download Transcripts
Clicking on a student name from the main Transcripts tab will bring up the transcript for that individual, which may then be modified or customized to display different semesters, downloaded, and printed.
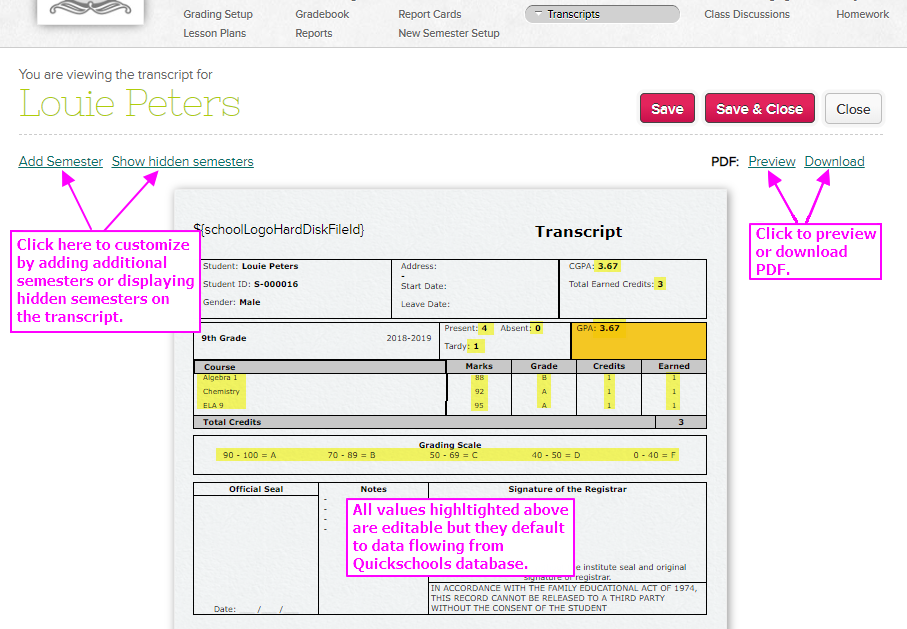
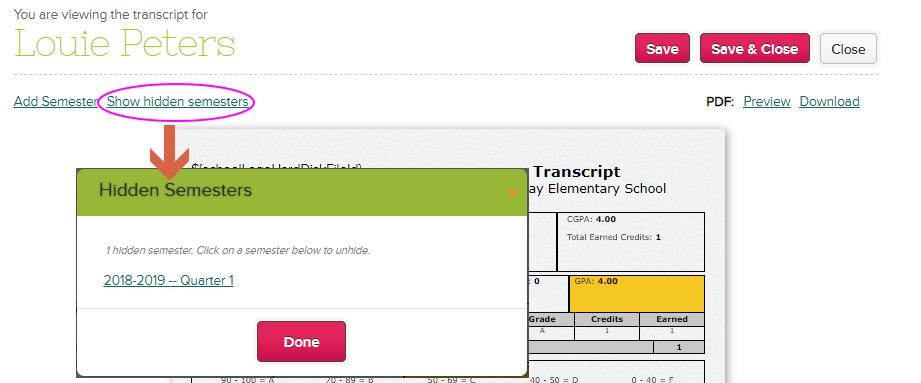
Hiding Semesters
To hide a semester, click the semester info box and select Hide semester from the options given.
To unhide semesters, use the “Show hidden semesters” link at the top of the page and select the semester.
Hiding Subjects
Click on the subject to be hidden > choose from the 2 options: Hide subject (for just this student) or Hide subject (for all students).
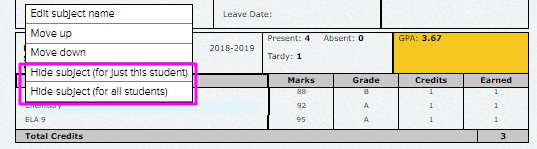
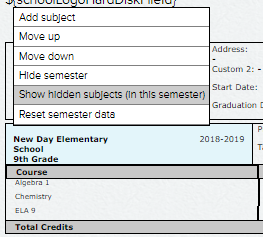
To unhide the subject, click on the semester box and select “Show hidden subjects (in this semester)”.
“Unhide all semesters and subjects” can also be found at the bottom of the student’s transcript.

Resetting Semester Data
In cases where the grades, attendance values or subject names are not getting updated on the transcript, you can reset the semester data.
To do so, click the semester info box of the semester in question and select Reset semester data from the options.
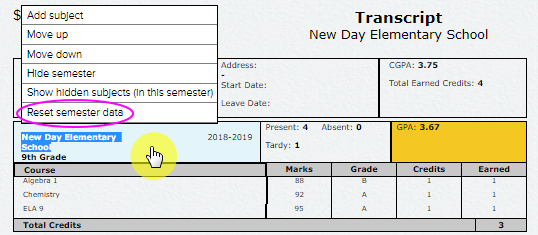
Locked values will then be updated and the semester will appear at the bottom of the list since by default, the template is configured to show the recent updated semester. Just move up the table until you reach the desired position. Save the changes.
Note: Please be careful in resetting semester data because manually entered values will be cleared. It is advisable to save a copy of the transcript before doing so.
Adding Custom Semesters
Click the Add Semester link above to add custom semesters like historical data or semesters taken from a different school. Enter the school name, grade level, academic year, and academic semester. Fields available are dependent on the set up you’ve enabled from the Template Selection tab.

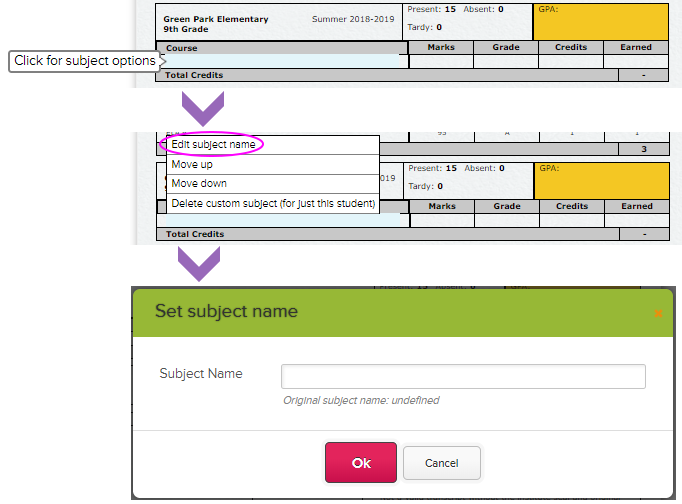
Click the Add Subject option to add a custom subject. Hover to the newly created row and click to see subject options. Manually enter the subject name by clicking the Edit subject name option.
Next, enter the marks, grades and credits manually. Earned credits, Total credits and GPA will automatically be computed after saving and closing the transcript.

Searching for Inactive Students
Just like on the Students module, you can search for inactive students by using advanced search option. Click the inverted triangle on the search box > select “Show students who have left” to show students who have already graduated, or “Show expelled students”.
Transcript templates can also be customized to suit the school’s requirements. Please send us an email to support@quickschools.com for pricing.
19MR0227