Quickschools Messaging is a powerful communications feature that enables schools to send messages to groups of parents or the entire school at one time through email, text messages, or voice messages. Create email and voice message templates for frequently sent messages including school closures, field trip information, or tuition information. You can also create and save recipient lists for groups that are contacted frequently such as the PTA, the school committee, or specific grade levels.
This admin guide provides detailed information on creating emails, text messages, and voice messages for mass mailing.
- Enabling Messaging
- Sending Emails
- Composing and Sending an Email
- Creating, Editing, and Deleting an Email Template
- Viewing Email History and Details
- Sending Text Messages
- Sending Voice Messages
- Recording, Editing, and Deleting a Voice Message
- Sending a Voice Message
- Setting a Call Back Number
- Viewing Call History and Details
- Working with Recipient Lists
Enabling Messaging
To enable the Messaging feature, click Settings at the top of the page and select Turn Features On/Off to open the Features page. Check the box next to Configure to refresh the page, the Messaging feature will then be available on the menu bar.

To configure the access of the feature, click the Configure link and select the users allowed for each field.

Sending Emails
With the Messaging feature, you can compose and send emails right from QuickSchools. In addition, you can make templates for emails that are sent frequently so that you don't have to keep retyping them. QuickSchools keeps a log of all sent email messages so you can quickly reference what emails have been sent and to whom.

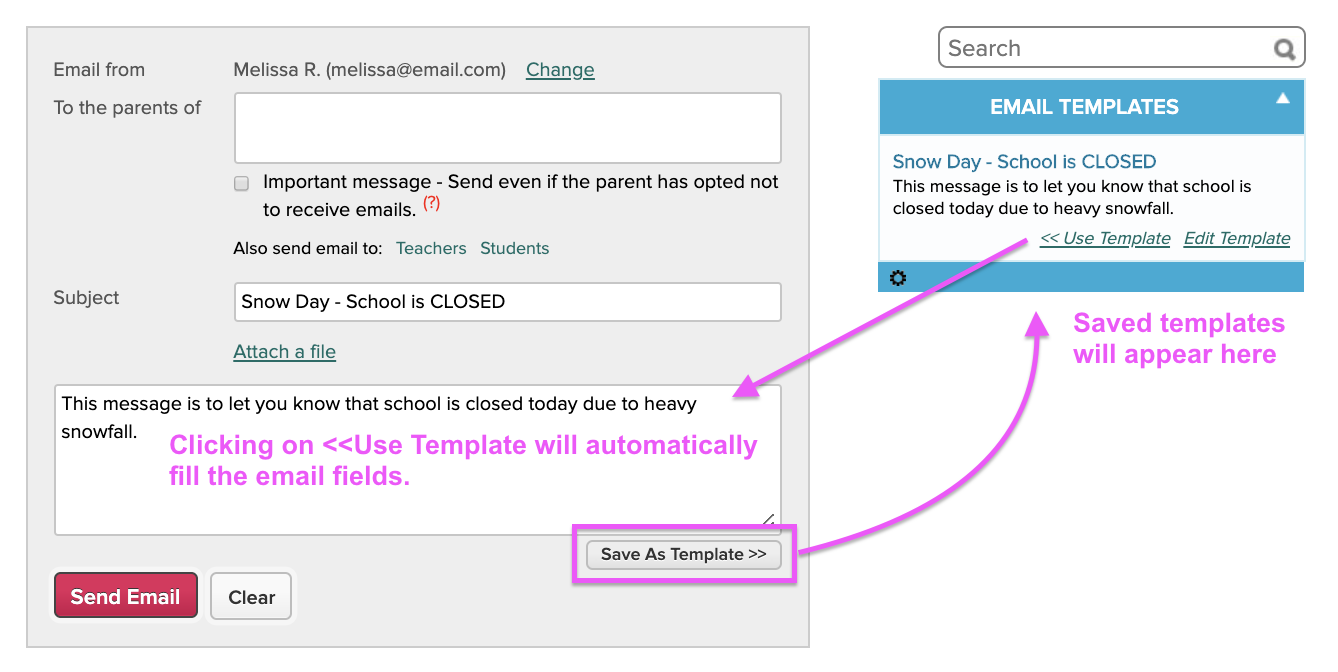
Composing and Sending an Email
- Make sure your name is displayed at the top of the form as the Message sender. If you want to change your name, click Change. Enter your name and email address in the appropriate text boxes. NOTE: This will not change your name and email on your account. If you want to permanently change this, go to your Teacher record and update your name and email.
- Select the names of the students whose parents you want to email by clicking the To the “Parents of” text box and selecting students from the drop-down menu. You can send messages to group of students in a grade level, homeroom, or course. You can even create your own group from the Recipient list.
- Check “Important message - Send even if the parent opted not to receive emails” if the email is important and you want every parent/guardian in your "send to" list to receive your email even if it overrides their preference not to receive emails from the school.
- If you want to send the email to teachers or students, click Teachers or Students and select their names from the drop-down menus.
- NOTE: Should you wish to receive a copy of the email, add your name as a recipient in the Teachers field.
- In the Subject line, type the subject of your email. You can add an attachment such as a file, form, or picture by clicking Attach a File.
- Write the text of your email. Click Send Email to send the email or Clear to erase the message.

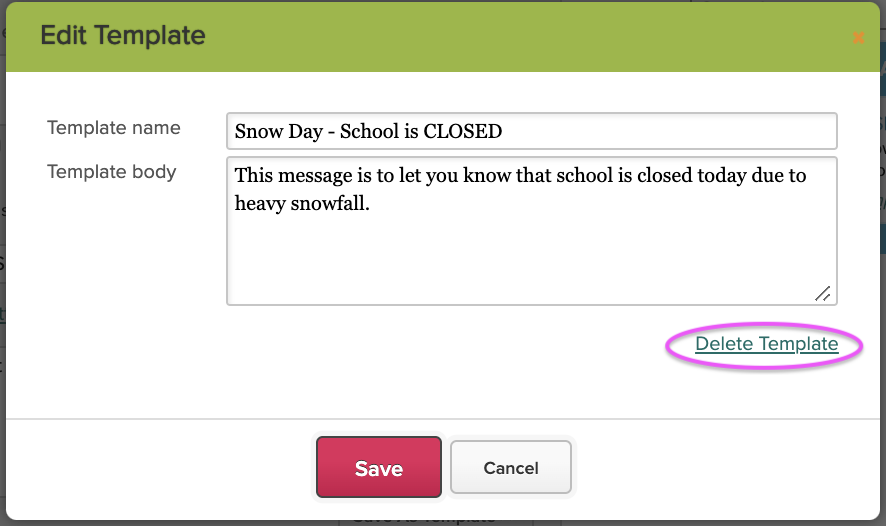
Creating, Editing, and Deleting an Email Template
You can save your email message as a template so that you can send the message again without retyping the email. After composing your email, click Save As Template. The email is saved and the new template displays in the Email Templates table.
To edit a template, go to the Email Template table, find the template you want to edit, and click Edit Template. Make any necessary changes, then click Save.
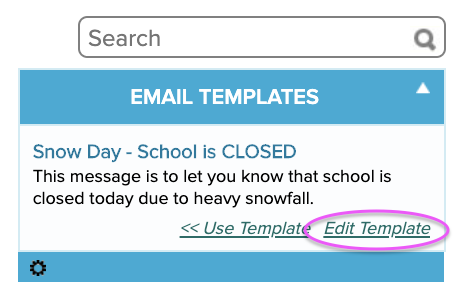
To delete an email template, go to the Email Template table, find the template you want to delete, and click Edit Template. Click Delete Template from the Edit Template dialog box. A dialog box displays asking you to confirm the deletion. Click Delete to delete the template or Cancel to leave the template unchanged.
Viewing Email History and Details
All emails sent through QuickSchools are recorded in the Email History table so that you can quickly find and refer to past email messages. Messages are sorted by date. The Status column shows how many emails were successfully sent, how many emails could not be sent, and any error messages. Some email messages and recipient lists are too long to display in the table, so a summary is shown. You can view the complete email and recipient list of a sent email message by clicking View Details or Show Full Message. The Email History table is located below the Send Email form.

Common email status and descriptions/solutions:
|
Email Status |
Description/Solution |
|
No email address available |
There is no email address on the parent, student or teacher record |
| Preferences not set |
The Email checkbox on the parent’s record on the student profile is not checked. Usually for parents who opted not to receive emails. |
|
Bounced email - Not delivering to a user who marked your messages as spam |
Contact Quickschools via chat or email so we can remove from our Bounce list |
|
Invalid email address |
Email address might be incomplete or has an extra space. E.g. “user@email.co”, “user @email.com” or “user@email.com “ instead of user@email.com |
|
Duplicate - Same email as |
Usually comes up if there’s a parent linked to 2 or more students. Only one email per email address will be sent. |
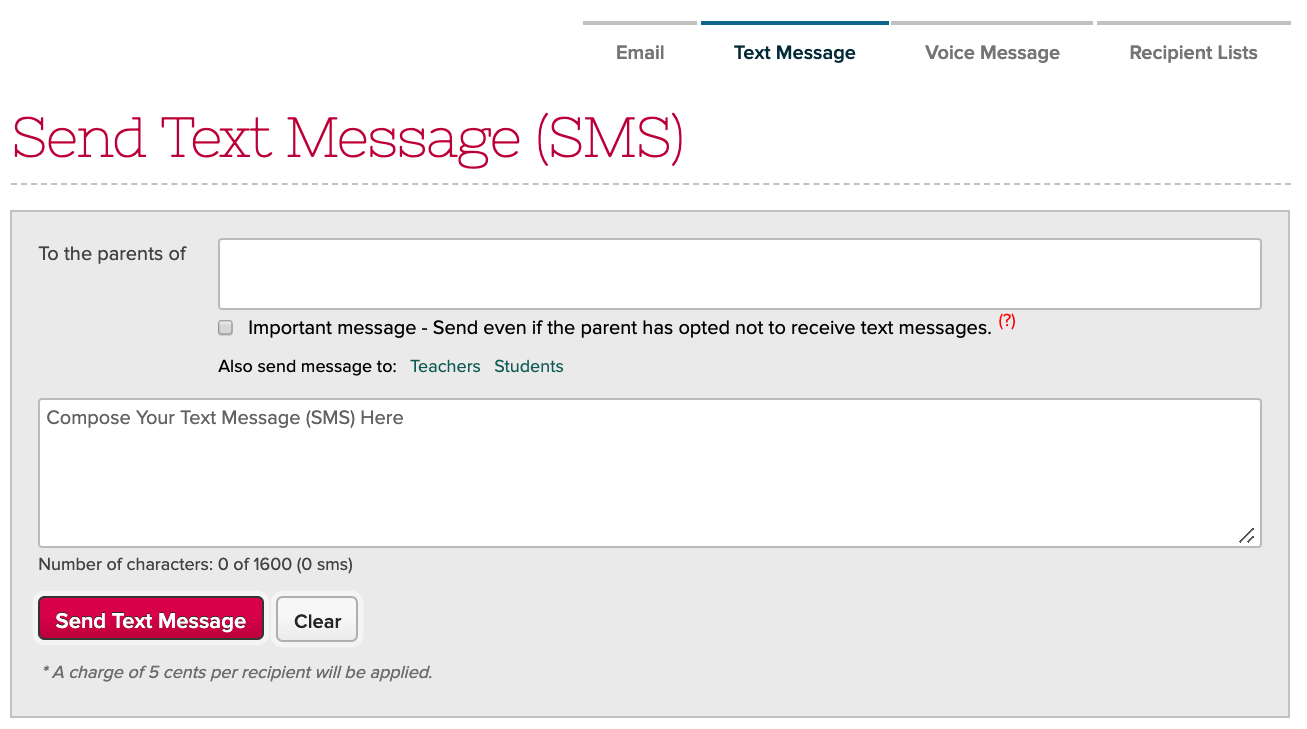
Sending Text Messages
The Text Message feature enables you to send text messages to parents, teachers, and students. QuickSchools keeps a log of sent text messages so you can reference what text messages have been sent.
There is a small fee charged per recipient when sending a text message.
Composing and Sending a Text Message
From the Text Message tab, you can write your text message. Select the names of the students whose parents you want to text message by clicking the “To the Parents of“ text box and selecting students from the drop-down menu. Check Important Message-Send even if the parent opted not to receive text messages if the text message is important and you want every parent in your "send to" list to receive your text message even if it overrides their preference not to receive text messages from the school. If you want to send the text message to teachers or students, click Teachers or Students and select their names from the drop-down menus. Finally, write your text message. Click Send Text Message to send the message or Clear to erase the message.
|
NOTE: The use of text messaging is NOT included in your monthly subscription. In order to send a text message, you must first purchase a credit. A charge of 5 cents per recipient will be applied and deducted from your credit. |
Purchasing Credits
To purchase a credit, go to the Account page. You’ll find the Text Message section on the right. Click any of the amounts to buy a credit. From the same page, you can also view your text message usage history and how much was deducted from your credit per text message.
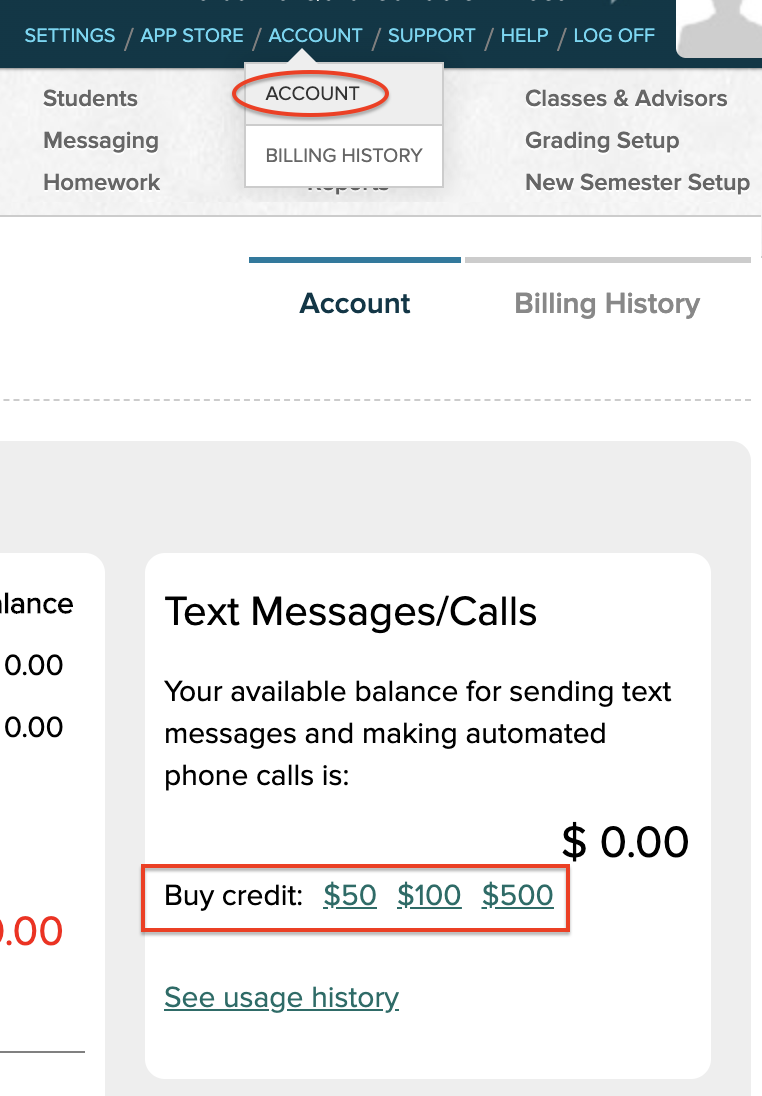
NOTE: Make sure you have enough credits when sending out text messages in bulk. If not, the text message will fail.
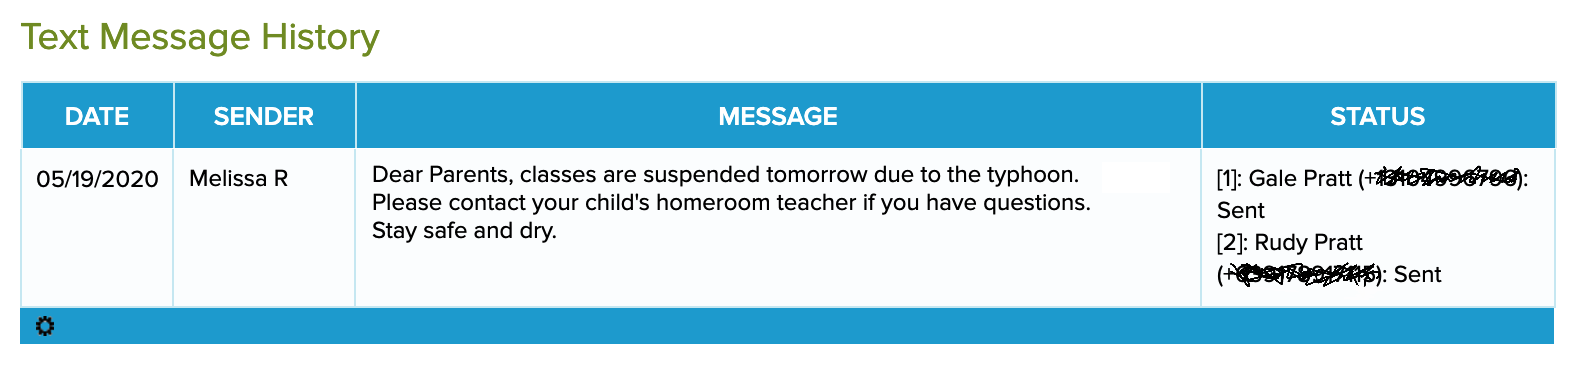
Viewing Text Message History
All Text Messages sent through QuickSchools are recorded in the Text Message History table so that you can quickly find and refer to past text messages. Messages are sorted by date. The Status column shows how many text messages were successfully sent, how many text messages could not be sent, and any error messages. The Text Message History table is located below the text message form.
Sending Voice Messages
Voice messaging is another powerful communications tool within Messaging. With QuickSchools Voice Messaging, you can record and save your most frequently sent voice messages, send your messages to multiple people in one click, and track your past voice messages.
|
A charge of 5 cents per recipient will be applied when sending a voice message. |
Recording, Editing, and Deleting a Voice Message
Before you can send a voice message, you need to record it. Recording messages is done right from your own phone. Simply enter your phone number and QuickSchools calls you. After you record your message, it is saved in the Pre-Recorded Voice Messages table and is ready to be sent.
To record your voice message, go to the Voice Message page > click Record a Message Now. The Record New Message dialog box opens.
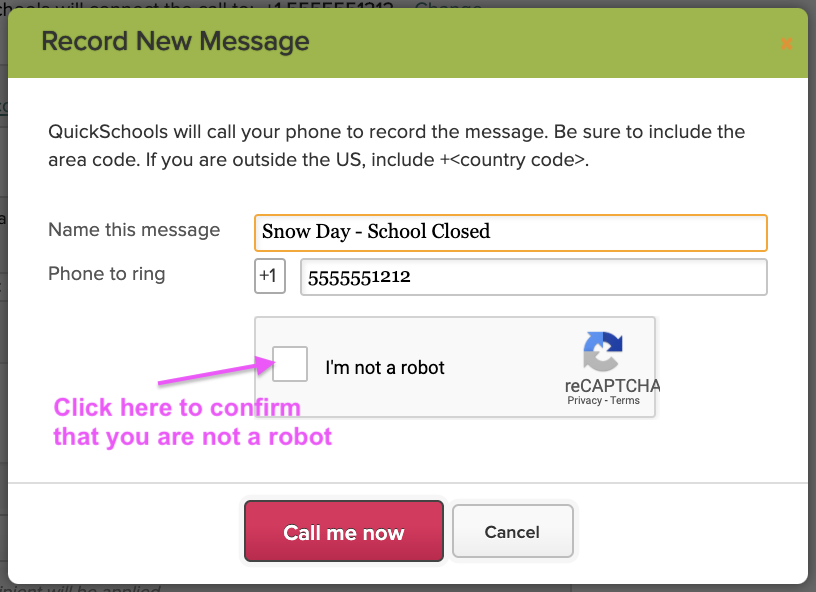
Enter the name of your message as you would like it to appear in the Pre-Recorded Voice Messages table. Next, starting with the area code, enter the phone number of the phone you would like to record from. The default country code is automatically displayed, but can be edited if necessary. Before continuing, click on the reCAPTCHA box to confirm that you are not a robot. This is a required security feature to protect the site from spam and abuse.
Click Call Me Now and QuickSchools will call your phone. When you answer, follow the instructions given to record your voice message. When you're done recording, press the "#" sign on your mobile phone's keypad before you hang up. It is that easy.
QuickSchools will then transcribe and posts your recorded message to the Pre-Recorded Voice Messages table on the right. Click Play to listen to your message.
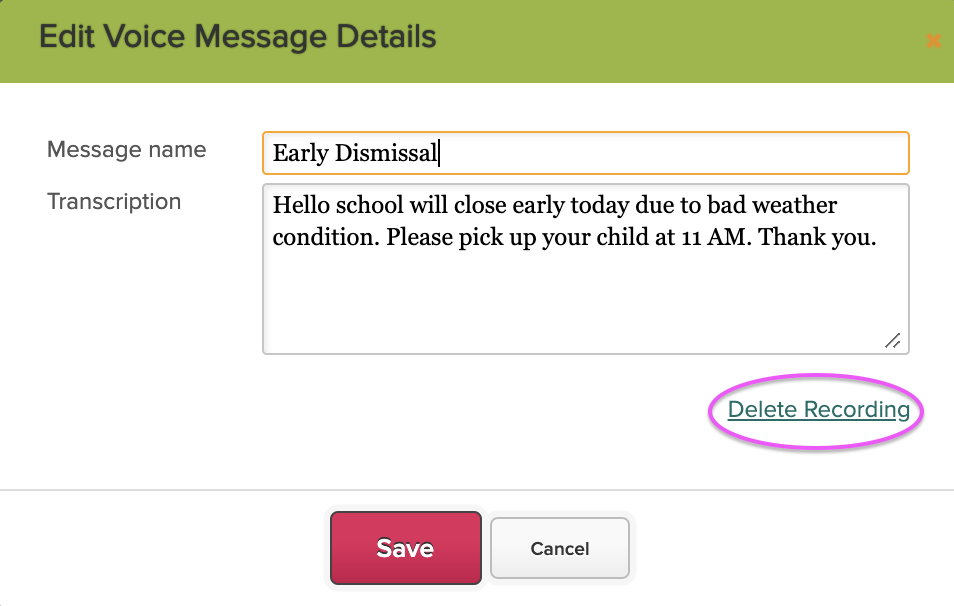
You can make any changes to the translation of your message or delete your recording by clicking Edit Details.
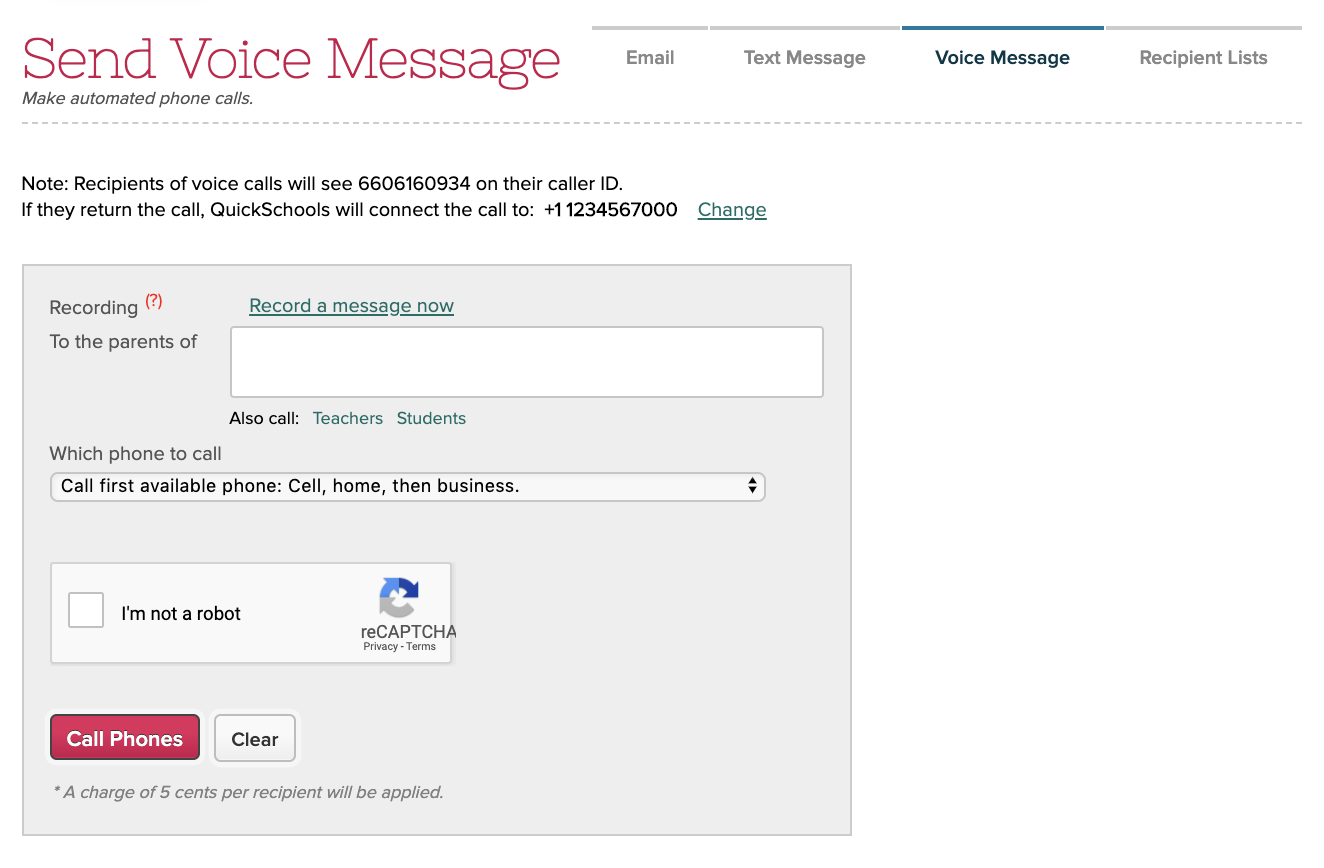
Sending a Voice Message
Now that you have recorded your message, you can address and send it quickly and easily. From the Send Voice Message page, select which phone message you want to send from the Pre-Recorded Voice Message table on the right. Click <<Use this Message to select it. The name of the Voice Message displays at the top of the Voice Message form.
Next, select the names of the students whose parents you want to send the voice message to by clicking the “To the Parents of“ text box and selecting students from the drop-down menu. If you want to send the email to teachers or students, click Teachers or Students and select their names from the drop-down menus. From the Which phone to call drop-down menu, select which phone option you prefer. Click Call Phones when you are ready to send the voice message.

Setting a Call Back Number
Parents may try to call the school back after receiving a voice message. You can set the phone number you would like parents to reach when they call back. For example, you may want to direct parent's return calls to a specific person in the office or to the school's answering machine so that the front desk is not overwhelmed with phone calls about the voice message.
To set a call back number, go to the Voice Message page. The current call back number is displayed under the Send Voice Message heading. To change the call back number, click Change.
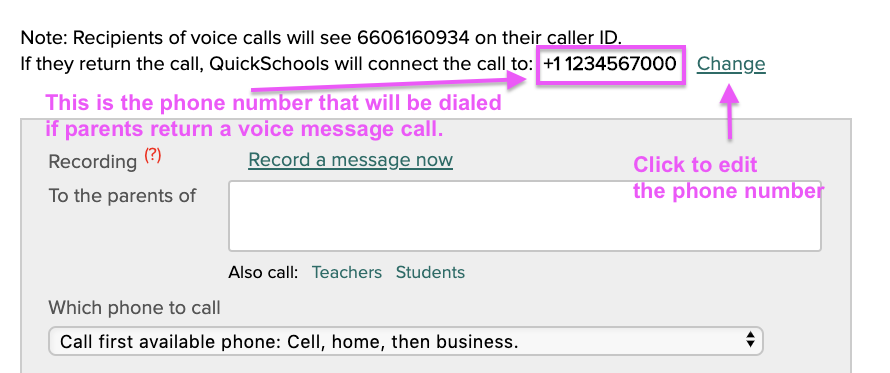
Enter the area code and phone number you would like parents to reach when they return your voice message call. If you are entering an international phone number, enter the country code. Click OK to change the number or Cancel to leave the number unchanged.

Viewing Call History and Details
All voice messages sent through QuickSchools are recorded in the Call History table so that you can easily find past voice messages. Messages are sorted by date and listed by voice message name. The Status column shows how many voice messages were successfully sent, how many voice messages could not be sent, and any error messages. To view the message and its recipient list, click View Details.
Do you need to send communication to a different group of students/parents? Visit our Recipeint List article to know ho you can set this up.
20MR0520