If you’re looking to build a schedule on QuickSchools, using our new Master Scheduler, where you have a weekly schedule with certain sections meeting twice a week, and others 4 times a week, this document describes how you can accomplish this goal using the Alternate Bell Schedule.
Here’s an example schedule that you may want to produce for a student:

Notice in this example:
- English, Math and Science meet 3 times a week
- Remaining courses are 2 times a week
Before you can build this schedule for each and every student, you’ll need to first figure out your main Bell Schedule. The weekly schedule can then be built using the Alternate Bell Schedule, which we’ll discuss here.
Determine Total Number of Periods
Start by figuring out how many periods you have available. In the example above, we are designating 5 periods per day, BUT the last 2 periods on Friday are unavailable for early dismissal. So that means that each student will actually only have 23 (i.e. 5 x 5 - 2 = 23) periods a week.
|
5 (periods per day) x 5 (days a week) - 2 (periods for early dismissal) = 23 (total periods per week) |
Categorize your Classes by Frequency
Now you’ll need to decide the types of courses you’ll have, based on the frequency of the classes. So in this case, we have 2 types of classes:
- Category A: Meets 2 times a week
- Category B: Meets 3 times a week
Assign number of Periods per Category
Based on the frequency of each class, you can start to calculate the number of total classes you can offer for each category based on the total number of periods available. In this example, Category A classes will take 2 periods, and Category B classes will take 3 periods. Here are some sample calculations:

Of course, the total number of periods should not exceed the number available. We’ve highlighted the combination where we have 7 Category A classes, and 3 Category B classes, which will make up 23 (i.e. 7 x 2 + 3 x 3 = 23) total periods.
|
(7 (A periods) x 2 (days a week)) + (3 (B periods) x 3 (days a week)) = 23 (total periods) |
Plan out your Period Structure
Now that you know what combination of classes you need, you can start planning out your period structure. To illustrate this, we’ve colored the 2-day Category A courses in BLUE, and the 3-day Category B courses in GREEN. And we’ve numbered each period based on their category:
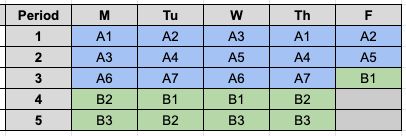
So from this example, out of the 23 available periods, we have a distinct list of 10 periods. We have 7 Category A periods, designated A1 thru A7, and 3 Category B periods, designated B1 thru B3. This will become your main Bell Schedule.
What your Bell Schedule will look like
Your Bell Schedule will be configured in 2 parts. As mentioned above, you will have a main Bell Schedule containing 10 periods, and then you will have 5 Alternate Bell Schedules containing 5 periods. The Alternate Bell Schedule is simply a reconfiguration of the main Bell Schedule, applied to a specific day of the week. When reconfiguring the Bell Schedule, you can move periods around and disable periods you don’t need.
Here’s an illustration of what the main Bell Schedule looks like as compared to the 5 Alternate Bell Schedules which you would set up in QuickSchools:
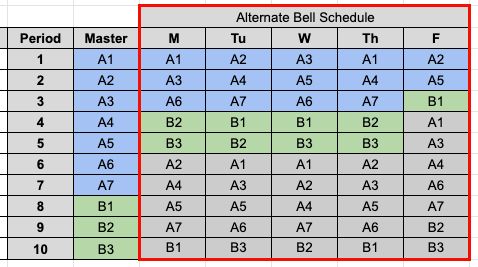
Although the Alternate Bell Schedule still contains 10 periods (to match the main Bell Schedule), you can disable the periods that are not applicable.
Configure your Bell Schedules
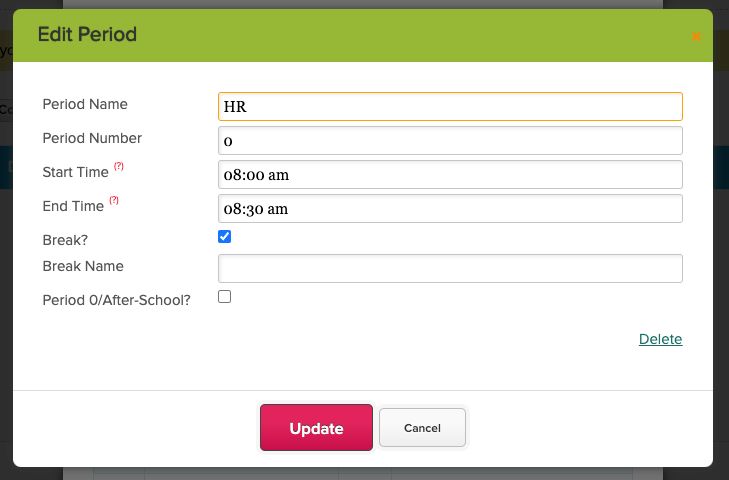
Now that you have an idea of how many periods you need in your main Bell Schedule, you can begin to set this up in your QuickSchools Master Scheduler. Here’s an example:

Once this has been setup, you can begin the scheduling process. The Alternate Bell Schedule can be set up later, and is simply a way of rearranging the main Bell Schedule into a weekly view.
NOTE: Please note that our Master Schedule requires that you designate a Period 0 for Period 0 attendance. No courses should be assigned to this period. Simply mark the period as a “Break”, and the period will not appear which scheduling in Steps 4 and 5.
Configure your Alternate Bell Schedules
As mentioned above, the Alternate Bell Schedules can be configured before or after the scheduling process. Here’s an example set up for Alternate Bell Schedules, based on the example discussed above:
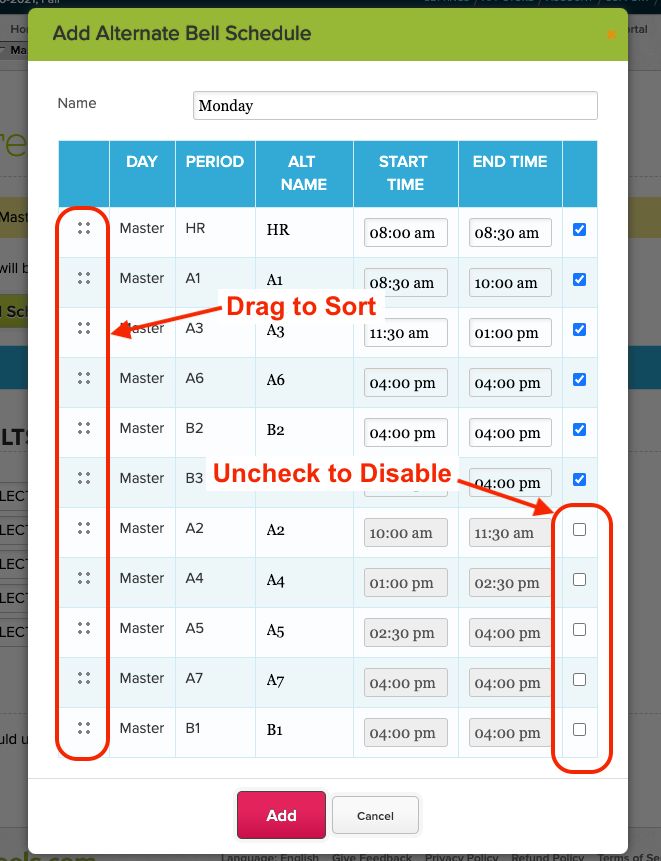
Use the 4 dots on the left most column to drag the periods up and down. The checkboxes on the rightmost column can be used to enable/disable the periods. Period names and times can also be changed.
Producing a weekly schedule
The Alternate Bell Schedule is used to produce a PDF schedule for each student, based on the sections that they have been assigned. Please note that you can only produce this PDF AFTER you have finalized the Master Scheduler in Step 6. There are several ways the schedule can be displayed.
Here’s an example PDF schedule generated using the default PDF template:
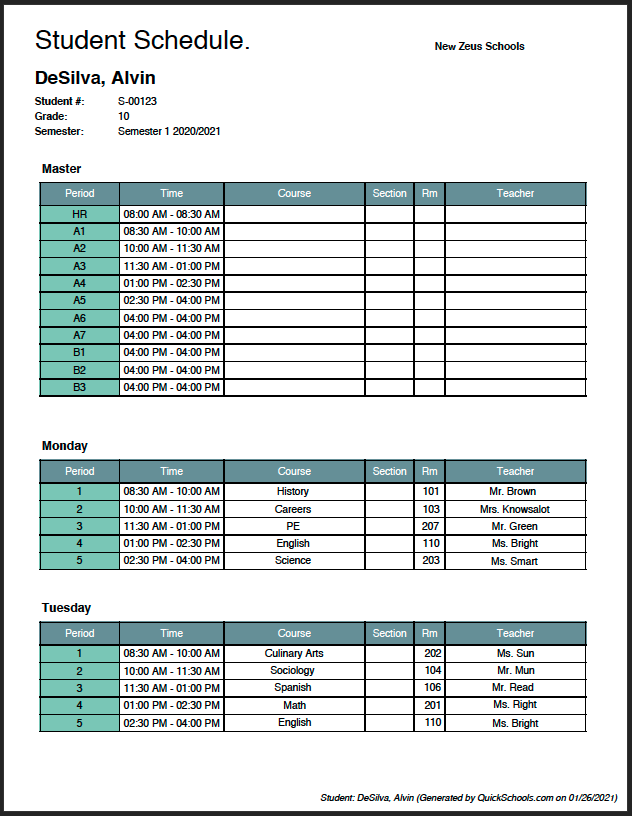
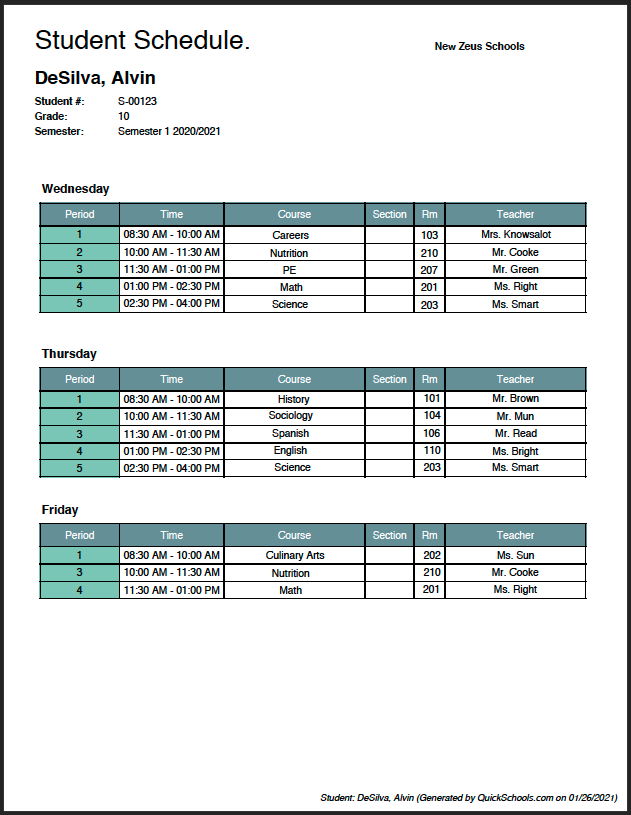
This template is the most robust, and clearly reflects the adjusted period names and start/end times for each Alternate Bell Schedule. The template also handles any number of Alternate Bell Schedules.
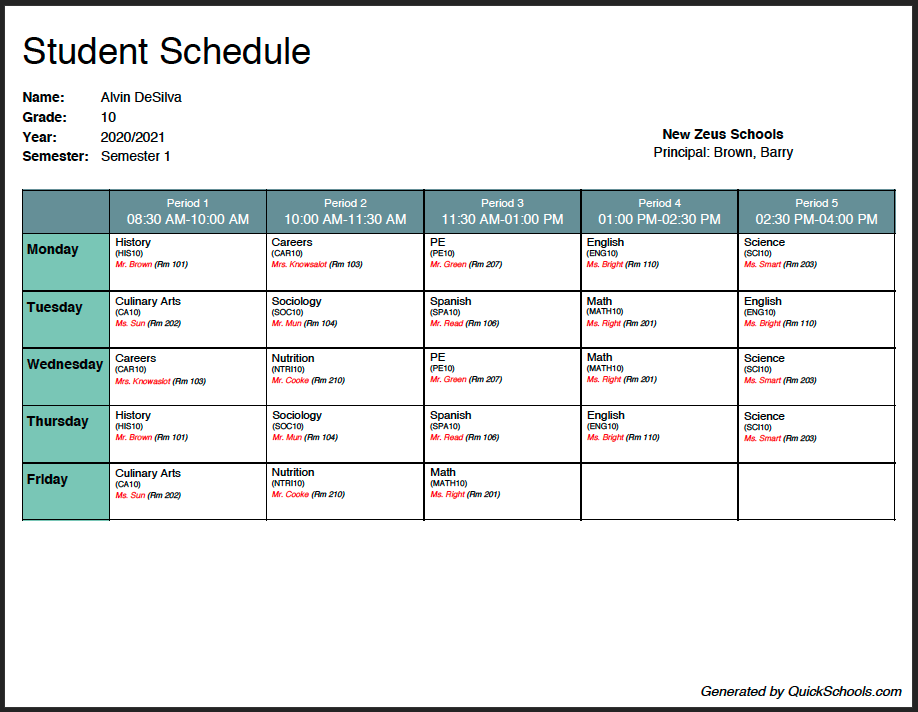
If you have a more traditional schedule, where the start/end times for each day are the same, and you have a weekly schedule:
Summary
As mentioned above, the Alternate Bell Schedules can be configured before or after the Master Scheduler is built. It is used to reconfigure how the main Bell Schedule is displayed for specific days. It can be used to adopt a schedule where classes meet a different number of times a week. However, some setup is required in order to accomplish the end product.
The process for Running and Loading the Master Schedule (Steps 4 and 5) for this scenario involves setting up constraints based on the category. This will be discussed in more detail in a separate article.