This document describes how to set up integration via Zapier.
- Zapier Integration Overview
- Setting up an Account on Zapier
- Creating a Zapier Integration
- Examples Scenarios (Zaps)
Zapier Integration Overview
Zapier is essentially a GUI interface for building your own integration to any system that has open APIs. This means that you can readily integrate QuickSchools with any other system, using Zapier as the go-between.
To facilitate this integration, you will need to first establish a link between Zapier and an external system (like QuickSchools). From there, you can create either a Trigger or an Action. These are described in more detail below:
Triggers in Zapier
A trigger is essentially an API call to an external system that checks for new / updated records. Once a new / updated record is detected, the Trigger can be used to facilitate an Action.
For QuickSchools, there are a specific set of API Resources that you can use to detect new records. Please see “API Endpoints in QuickSchools” section below for a complete list.
Actions in Zapier
Similar to Triggers, Actions are also an API call to an external system, EXCEPT instead of detecting changes, an Action will perform an action on a particular record (for example, create a new record, update a record, or delete a record).
For QuickSchools, a complete list of API Resources available for Actions are listed in the following site:
https://apidocs.quickschools.com
Zaps: Putting it all together
Once you’ve created Triggers and Actions in Zapier, you can then link them together into Zaps. So for example, you could have a trigger in QuickSchools to detect new students, and you can then have an Action to send out emails. By creating a Zap, you can link any number of Actions to a Trigger. This means that you can automatically send out emails when a student is created in QuickSchools.
Setting up an Account on Zapier
Signing up for an account
- Go to https://zapier.com/
- Click on Sign-up
- Enter Work Email, First Name and Last name
- Click on Sign Up
- Enter Password > Click on Sign Up
- Select your Role and Company Size > Click on Continue
- Select Apps you would want to use (optional)
Creating a Zapier Integration
Create a Zapier Integration App
- Go to https://developer.zapier.com/
- Click on Start a Zapier Integration

- Enter all required fields for the App
- Name (Example: QuickSchools)
- Description
- Intended Audience: select Private
- Role (Example: I have no affiliation with _)
- Category (Example: Education)
- Click on Create
Authentication
When setting up Authentication, you will need the following:
- API Endpoint
- API Key
API Core Resources
The following Core Resources can be used in creating Triggers, Actions, and Searches in Zapier
Triggers
List Students
GET: /sms/v1/students-zap
|
Parameter |
Description |
Req'd |
|
apiKey |
API Key generated in QuickSchools |
Yes |
|
mode |
Used to specify whether only newly added records or both added and updated records are returned. Default to add. Possible values:
|
No |
|
subdomain |
Specific school within a Group School |
No |
|
fields |
Additional fields to include in response. Requires a comma-separated list. Example: “fields”=”birthDate,customFields,leavePDate,letoTags-StudentFlexi” Acceptable values are the available fields for the Students API |
No |
|
showHasLeft |
Include students who have left. true/false |
No |
|
showDeleted |
Include deleted students. true/false |
No |
|
search |
Search by Student Full Name, Class, or Student Number |
No |
List Parents
GET: /sms/v1/parents-zap
|
Parameter |
Description |
Req'd |
|
apiKey |
API Key generated in QuickSchools |
Yes |
|
subdomain |
Specific school within a Group School |
No |
|
fields |
Additional fields to include in response. Requires a comma-separated list. Example: “fields”=”homePhone,cellPhone,email” Acceptable values are the available fields for the Parents API |
No |
|
showDeleted |
Include deleted parents. true/false |
No |
|
search |
Search by Parent Full Name |
No |
List Teachers
GET: /sms/v1/teachers-zap
|
Parameter |
Description |
Req'd |
|
apiKey |
API Key generated in QuickSchools |
Yes |
|
subdomain |
Specific school within a Group School |
No |
|
search |
Search by Teacher Full Name or Employee Number |
No |
List Sections
GET: /sms/v1/sections-zap
|
Parameter |
Description |
Req'd |
|
apiKey |
API Key generated in QuickSchools |
Yes |
|
subdomain |
Specific school within a Group School |
No |
List Section Enrollments
GET: /sms/v1/sectionenrollments-zap
|
Parameter |
Description |
Req'd |
|
apiKey |
API Key generated in QuickSchools |
Yes |
|
subdomain |
Specific school within a Group School |
No |
Actions
Update Student Record
POST: /sms/v1/students-zap
|
Parameter |
Description |
Req'd |
|
apiKey |
API Key generated in QuickSchools |
Yes |
|
subdomain |
Specific school within a Group School |
No |
|
studentId |
Student Number |
Yes |
|
fullName |
Student Full Name |
No |
|
firstName |
Student First Name. For Complex Student Names. Leave blank if fullName provided |
No |
|
middleName |
Student Middle Name. For Complex Student Names. Leave blank if fullName provided |
No |
|
lastName |
Student Last Name. For Complex Student Names. Leave blank if fullName provided |
No |
|
preferredName |
Student preferred name |
No |
|
birthDate |
Student birth date. Format should be yyyy-mm–dd. Example: “birthDate”=”2005-05-04” |
No |
|
gender |
Student gender. male/female |
No |
|
nationality |
Student country of origin |
No |
|
grade |
Grade Level ID |
No |
|
homeroomTeacherFullName |
Homeroom Teacher |
No |
|
homeroomName |
Homeroom Name |
No |
|
enrollmentDate |
Enrollment Date. Format should be yyyy-mm–dd. Example: “birthDate”=”2023-08-19” |
No |
|
fullAddress |
Student Address Line |
No |
|
city |
Student Address: City |
No |
|
state |
Student Address: State |
No |
|
zip |
Student Address: Zip |
No |
|
country |
Student Address: Country |
No |
|
phone |
Student home phone |
No |
|
cellPhone |
Student cell phone |
No |
|
fax |
Student fax |
No |
|
|
Student email address |
No |
|
medicalProblems |
Medical problems |
No |
|
currentMedicationNeeds |
Current medication needs |
No |
|
medicationAllergies |
Medication allergies |
No |
|
foodAllergies |
Food allergies |
No |
|
otherAllergies |
Other allergies |
No |
|
specialDietaryNeeds |
Special dietary needs |
No |
|
additionalInformation |
Additional medical information |
No |
|
fields |
Additional fields to include in response. Requires a comma-separated list. Example: “fields”=”customFields,leavePDate,letoTags-StudentFlexi” Acceptable values are the available fields for the Students API |
No |
|
reactivateIfInactive |
Re-enrolls the student record if inactive. true/false |
No |
|
checkPreenrolled |
Checks pre-enrolled student records and updates accordingly. true/false |
No |
|
preenrolledToRegular |
Change Pre-enrollment to Regular Enrollment. true/false |
No |
|
regularToPreenrolled |
Change Regular Enrollment to Pre-enrollment. true/false |
No |
|
customFields |
Student Custom Fields. Send as an JSON array of key-value pair, Example: ”[“Passport:P-013248972A”,”Current Program Level:Intermediate”]” |
No |
|
key - Custom Field Name. |
Yes |
|
|
value - Custom Field Value. |
Yes |
Create Admissions Application
POST: /sms/v1/studentapplications-zap
|
Parameter |
Description |
Req'd |
|
apiKey |
API Key generated in QuickSchools |
Yes |
|
subdomain |
Specific school within a Group School |
No |
|
applicantName |
Applicant Name |
Yes |
|
preferredName |
Preferred Name |
Yes |
|
birthDate |
Applicant date of birth. Format should be yyyy-mm–dd. Example: “birthDate”=”2005-05-04” |
Yes |
|
gender |
Applicant gender |
Yes |
|
applicationRemarks |
Application Remarks |
Yes |
|
phone |
Phone number |
Yes |
|
|
Email Address |
Yes |
|
currentSchool |
Current School |
Yes |
|
currentGrade |
Current Grade |
Yes |
|
enrollmentDate |
Enrollment date. Format should be yyyy-mm–dd. Example: “birthDate”=”2005-05-04” |
Yes |
|
address |
Student Address: Address Line |
No |
|
city |
Student Address: City |
No |
|
state |
Student Address: State |
No |
|
zip |
Student Address: Zip |
No |
|
homePhone |
Student Home Phone |
No |
|
cellPhone |
Student Cell Phone |
No |
|
fax |
Student Fax |
No |
|
studentEmail |
Student Email Address |
No |
|
medicalProblems |
Medical problems |
No |
|
currentMedicationNeeds |
Current medication needs |
No |
|
medicationAllergies |
Medication allergies |
No |
|
foodAllergies |
Food allergies |
No |
|
otherAllergies |
Other allergies |
No |
|
specialDietaryNeeds |
Special dietary needs |
No |
|
additionalInformation |
Additional medical information |
No |
|
customFields |
Student Custom Fields. Send as an JSON array of key-value pair, Example: ”[“Passport:P-013248972A”,”Current Program Level:Intermediate”]” |
No |
|
key - Custom Field Name. |
Yes |
|
|
value - Custom Field Value. |
Yes |
|
For other endpoint, please refer to the following site: |
API Key in QuickSchools
You can obtain your QuickSchools API Key for your school, by going to the Developer Console:
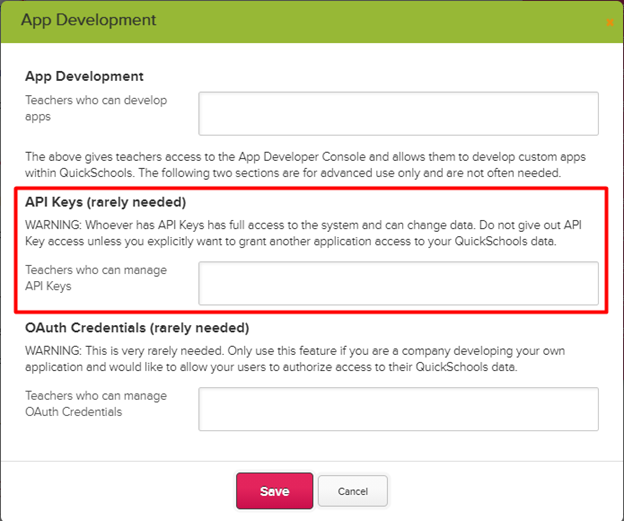
- Enable the Developer Console:
- Go to Settings > Turn Features On/Off tab
- On the bottom most portion of the screen, click on Enable under “Interested in developing your own apps?”

-
- Once enabled, you will be asked to configure the module. Ensure that you have access to the API Key
-
- Once the configuration is saved
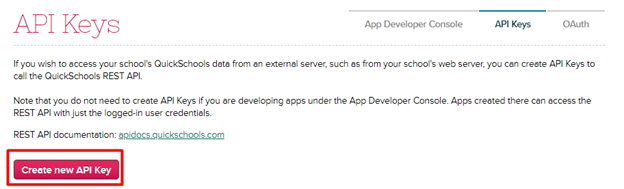
- Go to App Developer Console > API Keys tab
- Click on Create New API Key
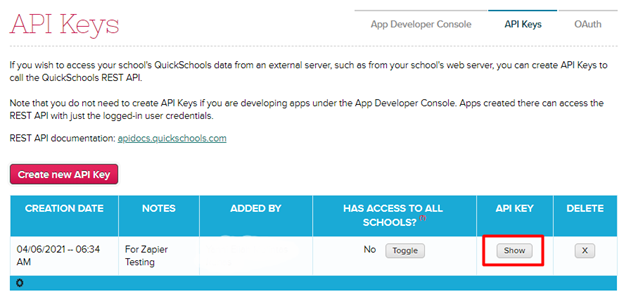
- Enter the description for the API Key
- Once the configuration is saved
-
- Once the API Key has been created, to access the key, click on Show under the API KEY column
|
NOTES:
|
Setting up the Authentication in Zapier
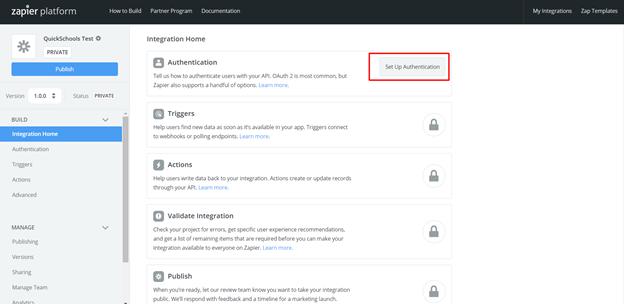
- In the Integration Home
- Click on Setup Authentication
-
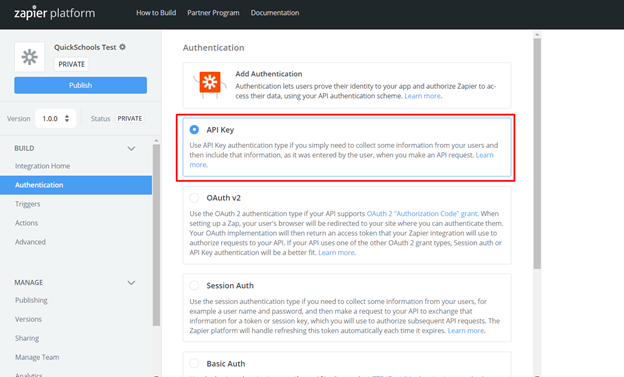
- Select API Key
- Click on Save
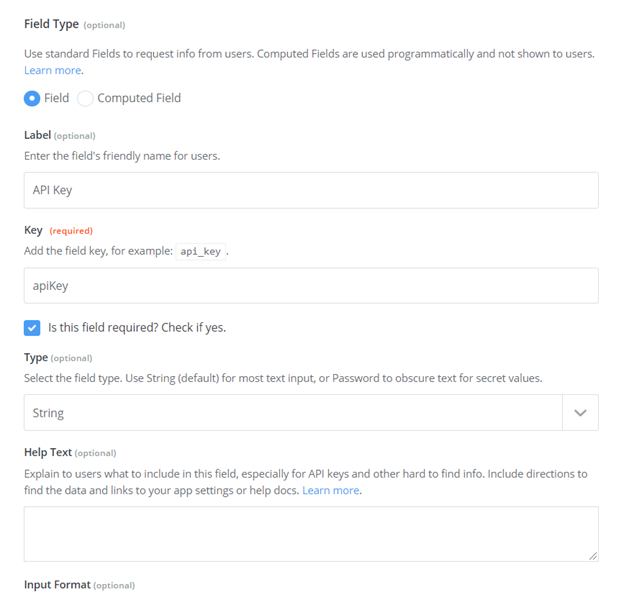
- Under Step 1: Configure your Fields
- Click on Add Fields

-
-
- Enter the Label (Example: API Key)
- Enter the Key (Example: apiKey)
- Set the field as Required
- Set the Default Value (optional)
- You can set the API Key from QS as the default value
- Click on Add
-
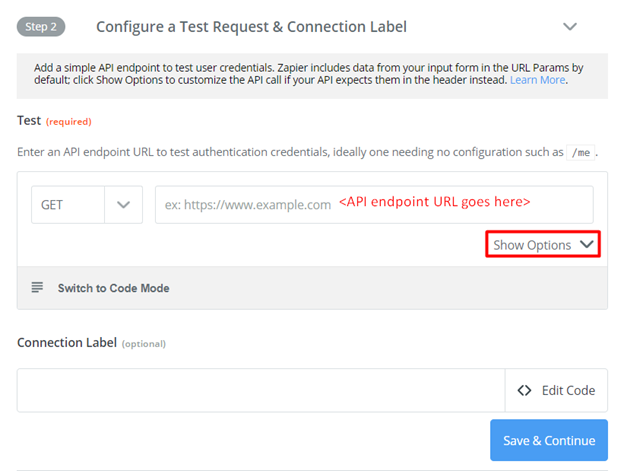
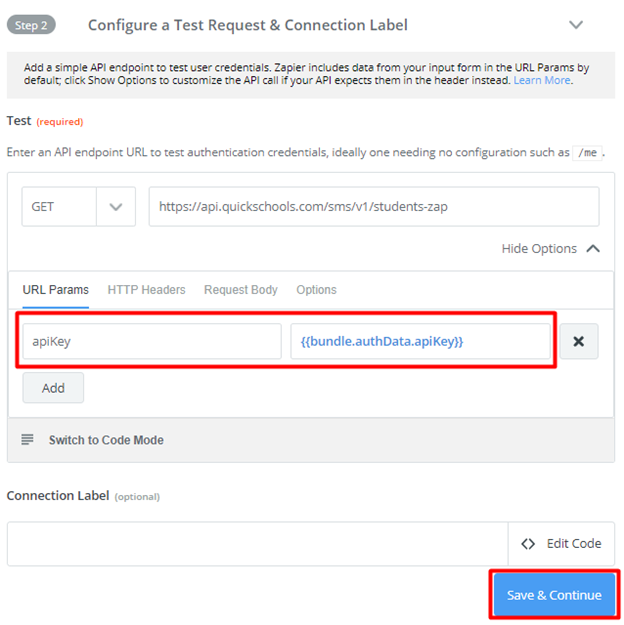
- Under Step 2: Configure a Test Request & Connection Label
- Set the API Endpoint URL (see resources above)
-
- Click on Show Options
- Ensure that the URL Params is apiKey - {{bundle.authData.key}}
- Click on Save & Continue
- Click on Show Options
- Under Step 3: Test your Authentication
- Click on “Sign in to [APP_NAME]”
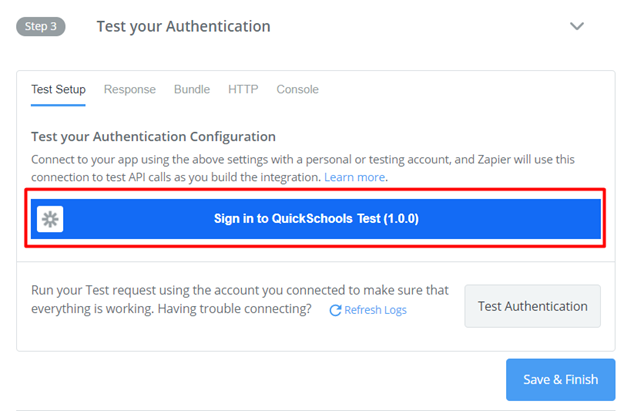
-
-
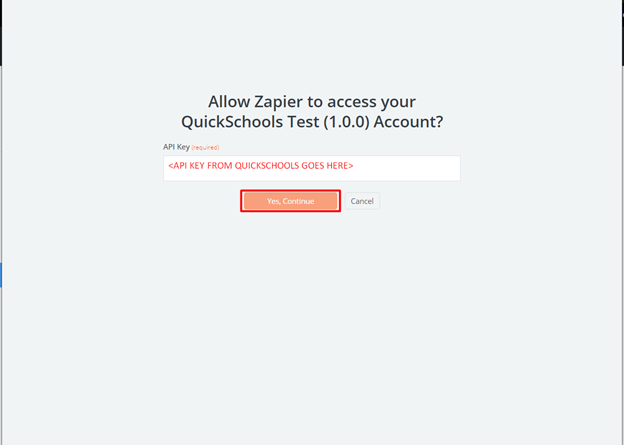
- Enter the required field -- API Key
- Click on Yes, continue
-
-
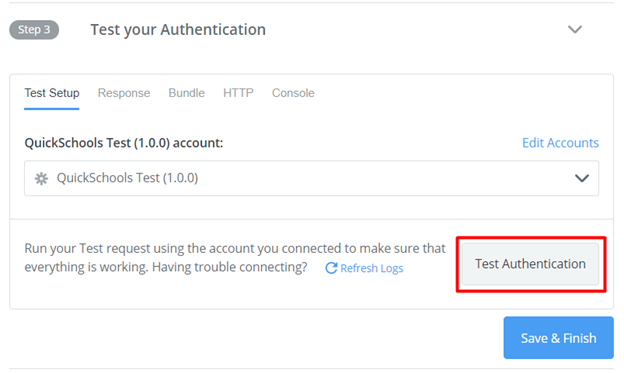
- Click on Test Authentication
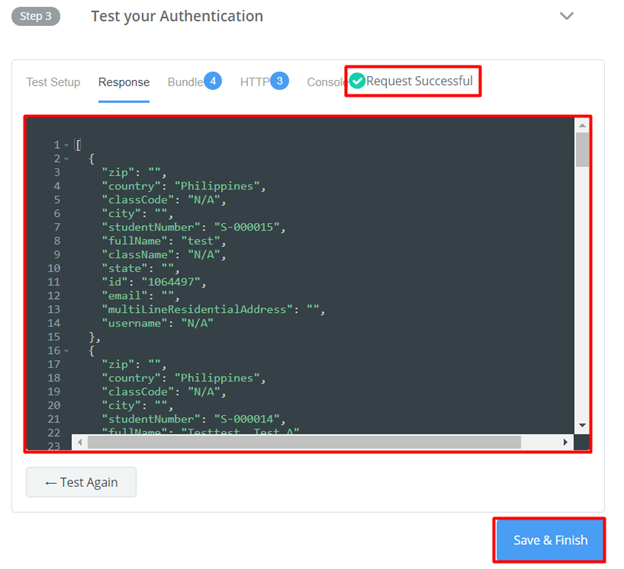
- Once successful, click on Save & Finish
If the authentication is successful, you would see a “Request Successful” and a set of data under the Response tab.
|
NOTES:
|
Setting up a Trigger
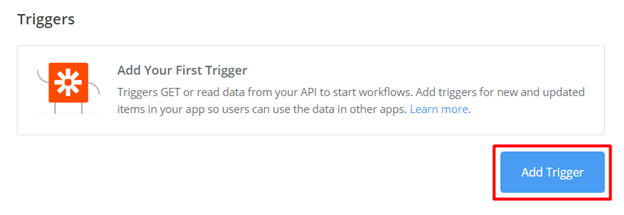
- In your Integration Dashboard, click on Triggers (found on the Left Panel)
- Click on Add Trigger
-
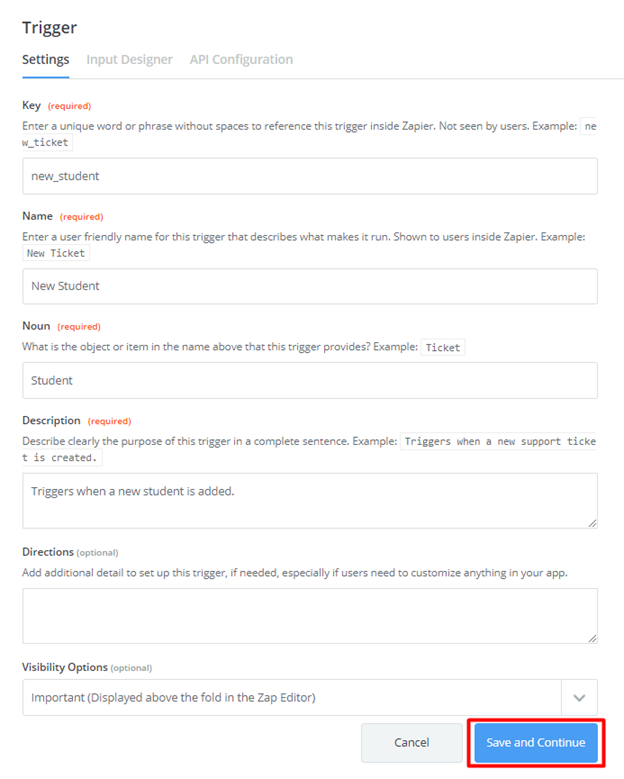
- Enter the Key (Example: new_student)
- Enter the Name (Example: New Student)
- Enter the Noun (Example: student)
- Enter the Description (Example: Triggers when a new student is added)
- Enter the Directions (Optional - ideal if input is needed from user)
- Select Visibility
- Click on Save and Continue
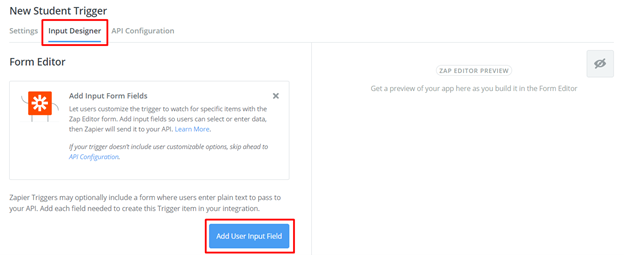
- If you would want to add filters or allow users to enter data, you can add the fields in the Input Designer Tab; Otherwise skip this step and go straight to the API Configuration.
- Click on Add User Input Field
-
-
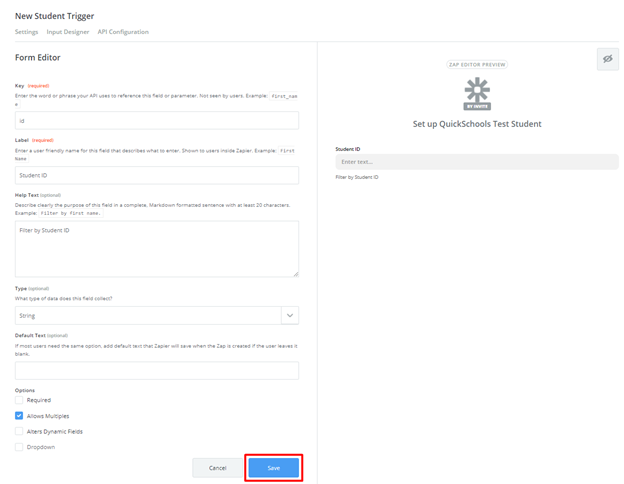
- Enter the Key
- Enter the Label
- Enter the Help Text (Optional)
- Select the Field Type
- Enter the Default Text (Optional)
- Set additional options:
- Required
- Allows Multiples
- Alters Dynamic Fields
- Dropdown
- Click on Save
-
- Once your input fields have been set (optional), you can now setup your API Configuration:
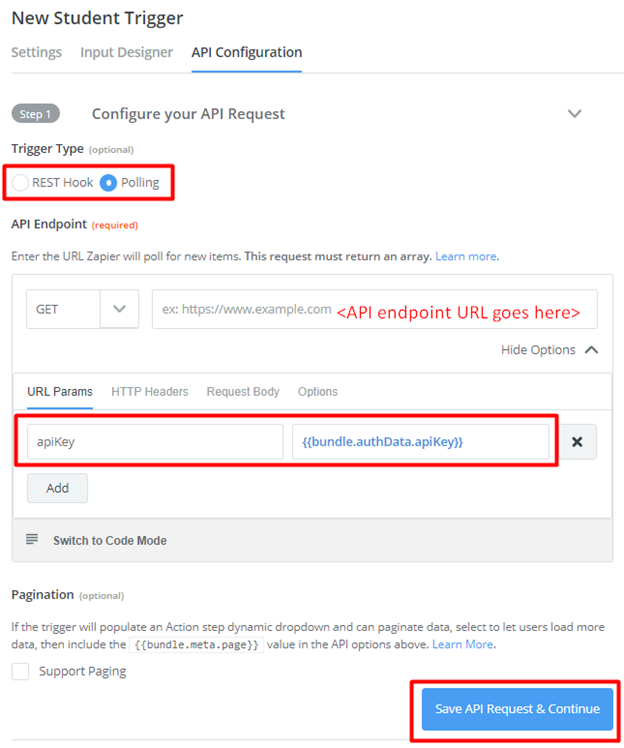
- Step 1: Configure your API Request
- Set the Trigger Type:
- REST Hook - This allows Zaps to run as soon as new data comes into your app.
- Polling - Zapier sends a GET request to an API endpoint URL to request new data
- Set the Trigger Type:
- Set the API Endpoint
- Enter the API endpoint URL
- Click on Show Options
- Set the apiKey Value
- Set the Pagination (Optional)
- Click on Save API Request & Continue
- Step 1: Configure your API Request
- Step 2: Test your API Request
- Select the account you would want to test (automatically set)
- Click on Test Your Request

-
-
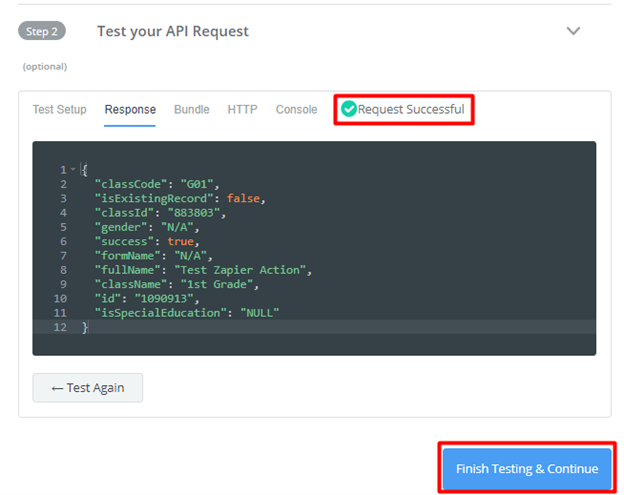
- If test is successful, click on Finish Testing & Continue
-

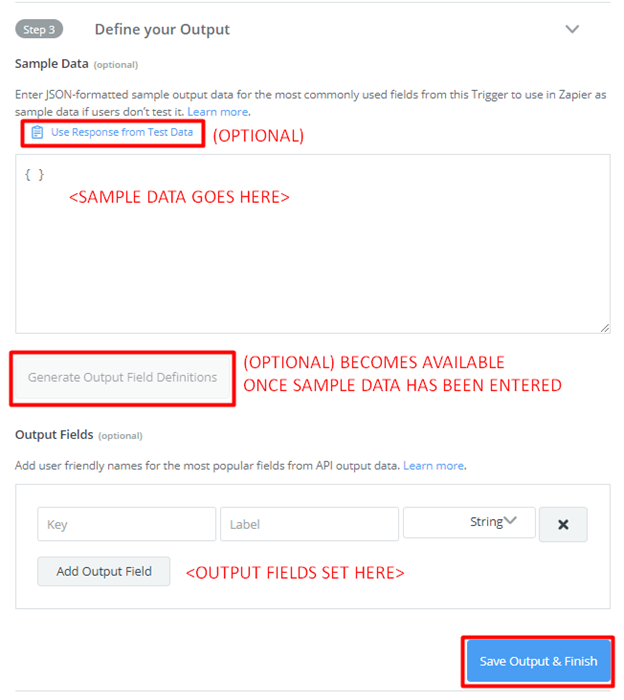
- Step 3: Define your Output
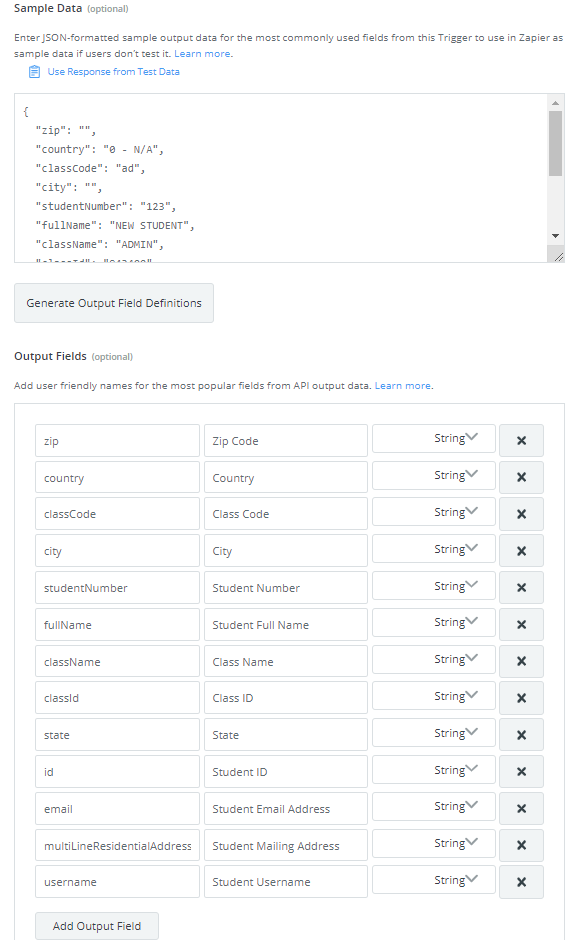
- Enter Sample data
- Click on Use Response from Test Data to use the data from the successful API Request; Otherwise, manually enter the values
- Define your Output Fields
- Click on Generate Output Field Definitions to automatically add Output Fields based on the Sample Data; Otherwise, manually enter the values:
- Set the Key
- Set the Label
- Set the Field Type
- Click on Save Output & Finish
- Click on Generate Output Field Definitions to automatically add Output Fields based on the Sample Data; Otherwise, manually enter the values:
- Enter Sample data
Example:
|
NOTES: |
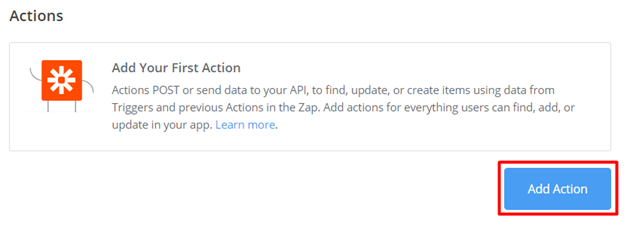
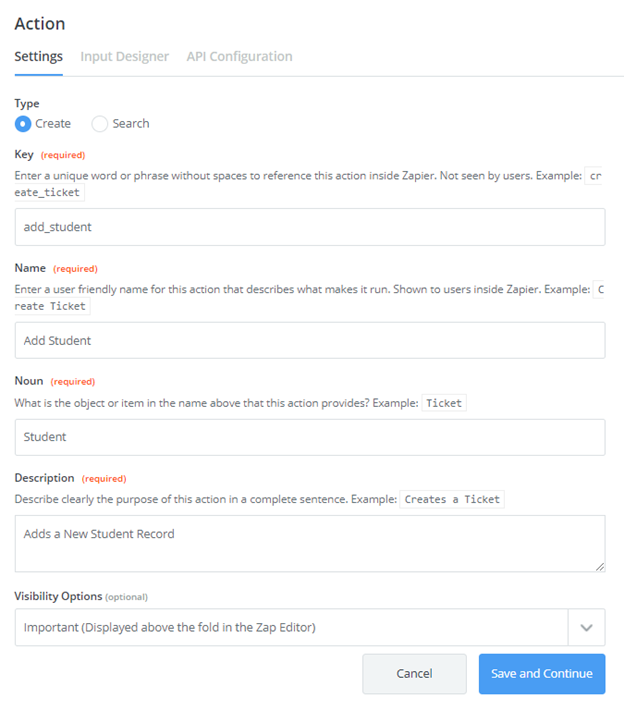
Setting up an Action
- In your Integration Dashboard, click on Actions (found on the Left Panel)
- Click on Add Action
- Configure the Action Setting
- Select the Action Type
- Create - creates new items from the data users enter.
- Search - find data in apps and optionally create new items if the search returns no results.
- Enter the Key (Example: new_student)
- Enter the Name (Example: New Student)
- Enter the Noun (Example: Student)
- Enter the Description (Example: Creates a new Student Record)
- Set the Visibility Options
- Click on Save and Continue
- Select the Action Type
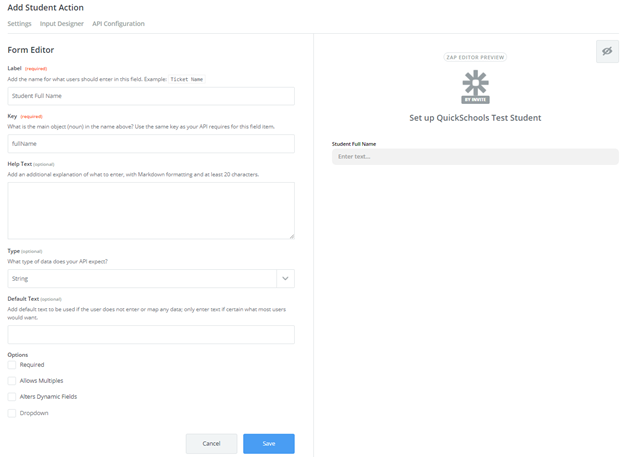
- Configure your Input Fields (Optional)
- Under Input Designer > Click on Add > Select the Field Type
- Input Field - the main type of field that most integrations use, with 10 field types to let users enter plain text data and map variables from previous triggers and actions into the field.
- Dynamic Field - make API calls to your app, then show the returned data in a dropdown menu so users can select the item needed, often used for folders, projects, assignees, and other data that would need to be chosen from your app.
- Line Item Group - organize a set of Input Fields to create line items, where each item in a comma separated list entered in the field would create a new separate item in your app, often used for line items in invoice and accounting apps.
- Under Input Designer > Click on Add > Select the Field Type
-
- In our case, we will select Input Field
- Enter the Label
- Enter the Key
- Enter the Help Text (optional)
- Select the Field Type
- Enter the Default Test (optional)
- Set the additional options
- Required
- Allows Multiple
- Alters Dynamic Fields
- Dropdown
- Click on Save
- In our case, we will select Input Field
- Repeat the process until all input fields have been added.
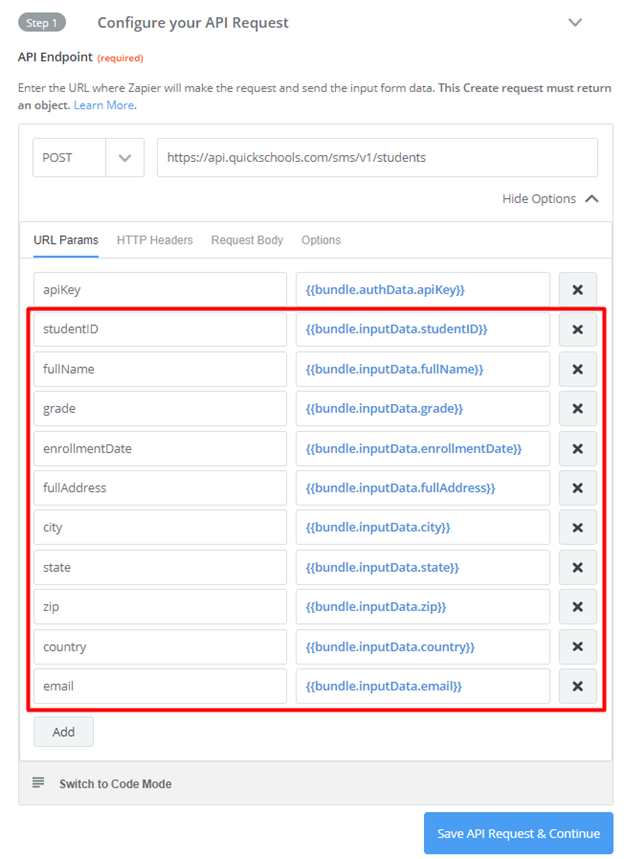
- Setup the API Configuration
- Step 1: Configure your API Request
- Enter API endpoint URL
- Ensure that the URL Params are set
- Input Values would need to be set as URL Params and Removed from the Request Body
- Use identifier {{bundle.inputData.[field_name]}} (replace [field_name] with the Key value of the field)
- Click on Save API Request & Continue
-
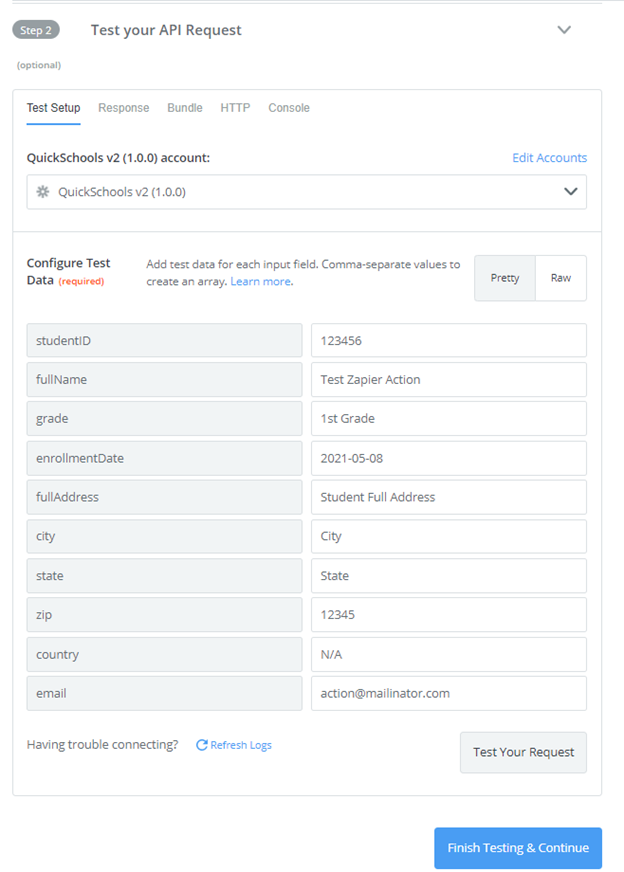
- Step 2: Test your API Request
- Select the Account to be used for the test
- Enter the values for the input fields set
- Click on Test Your Request
- Step 2: Test your API Request
-
-
- If test is successful, click on Finish Testing & Continue
-
-
- Step 3: Define your Output
- Enter Sample Data (optional)
- Define Output Fields (optional)
- Step 3: Define your Output
|
NOTES: |
Examples Scenarios (Zaps)
Here we discuss examples on how the QuickSchools API is used to address a specific use case, but linking either a Trigger or Action into a Zap.
Example 1: Adding a Student Record (Action)
To test the integration, besides in the Developer Platform
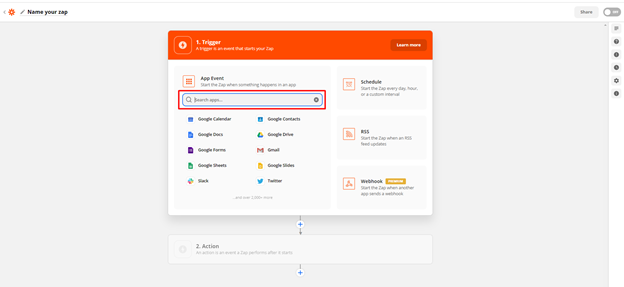
- Go to https://zapier.com/app/dashboard
- Click on Make a Zap
- Setup your Trigger
- In our example, the new student found in the trigger (below) will be added to a different QuickSchools Account.
- Search for the App you created for the Action
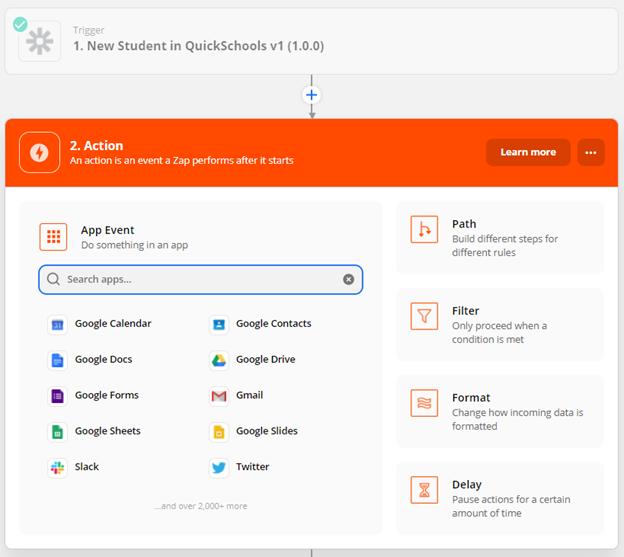
- Select the Action Event from the list
- Click on Continue

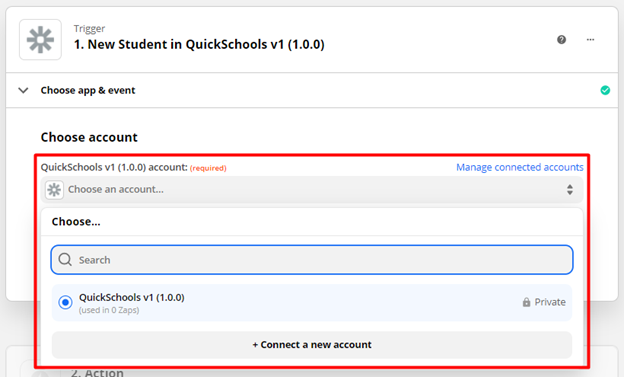
- Select the account to use (initialized during the Authentication Setup)
- Click on Continue

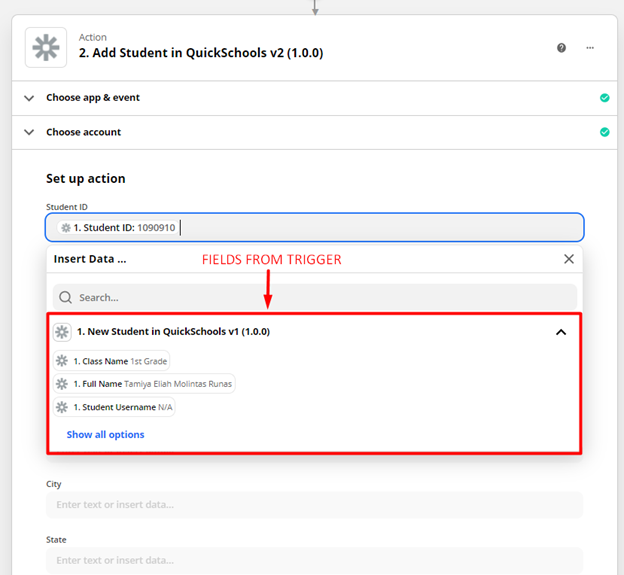
- Map fields from your Trigger
- Click on Continue
- Click on Test & Review
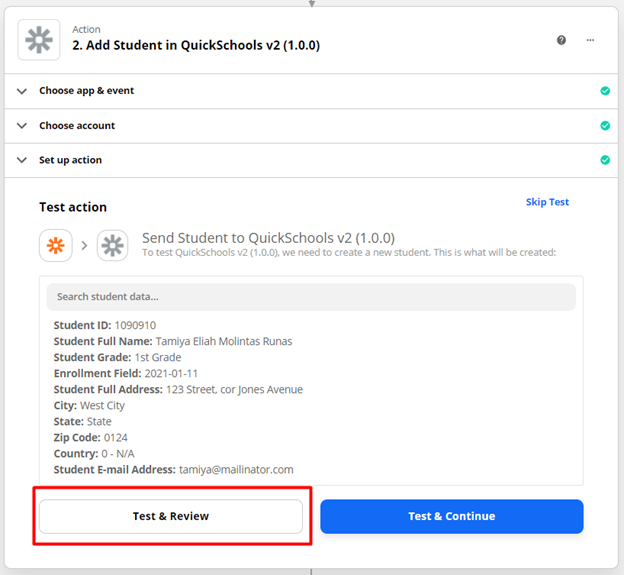
- Once the Test is Successful, you can either Retest the Action or Turn on the Zap

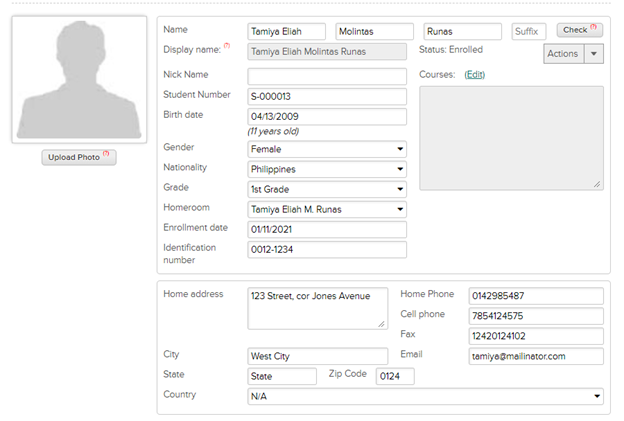
Example 2: When a new Student record is created (Trigger)
To test the integration, besides in the Developer Platform
QuickSchools:
- Create a new student record in QuickSchools
Zapier:
- Go to https://zapier.com/app/dashboard
- Click on Make a Zap
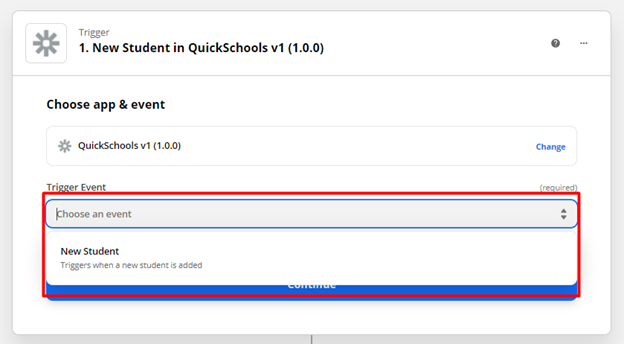
- Search for the App you created for the Trigger
- Select the Trigger you created from the list.
- Click on Continue
- Select the account to use (this would be created during the initial login when setting up the Authentication)
- Click on Continue
- Click on Test Trigger

- The most recently added student record would appear in the output.

If you have any questions or concerns with the setting up your Zapier Integration, feel free to contact us via chat or email us at support@quickschools.com.