The Fee Tracking and Student Billing feature enable you to manage student fees and payments. With Fee Tracking, you can keep an up-to-date record for all fees and charges that students owe. You can make personalized lists of common and standard charges, so adding charges to a student's account is done quickly. For a more streamlined billing system, family billing can be enabled so that all students within a family can be viewed together and charged at the same time.
This article offers detailed information on managing charges, generating statements, recording payments, issuing refunds, making personalized lists of charges, and working with family billing.
- Introduction to Fee Tracking
- Enabling and Disabling the Fee Tracking Feature
- Accessing the Fee Tracking Page
- Adding and Deleting a Charge
- Adding and Applying a Standard Charge
- Generating and Deleting a Statement
- Recording and Deleting a Payment
- Adding and Deleting an Invoice
- Issuing a Refund
Introduction to Fee Tracking
Fee Tracking begins with the Student Billing table. The Student Billing table shows you a summary of students and account balances. Clicking on a student in the Student Billing table enables you to add, view, and delete charges, generate PDF statements, and issue refunds.
If Family Billing is turned on, the billing table is sorted by family which is determined by primary payer. See Configuring Family Billing for more information.
Enabling and Disabling the Fee Tracking Feature
Like all Features in QuickSchools, you can turn on or turn off a feature and configure access rights and privileges via the Features link near the top right of your screen. This ability is limited to the school admin users.
- Click SETTINGS at the top of the page > then click TURN FEATURES ON/OFF.

- The Features page opens. Go to the row that says School Fees Tracking.
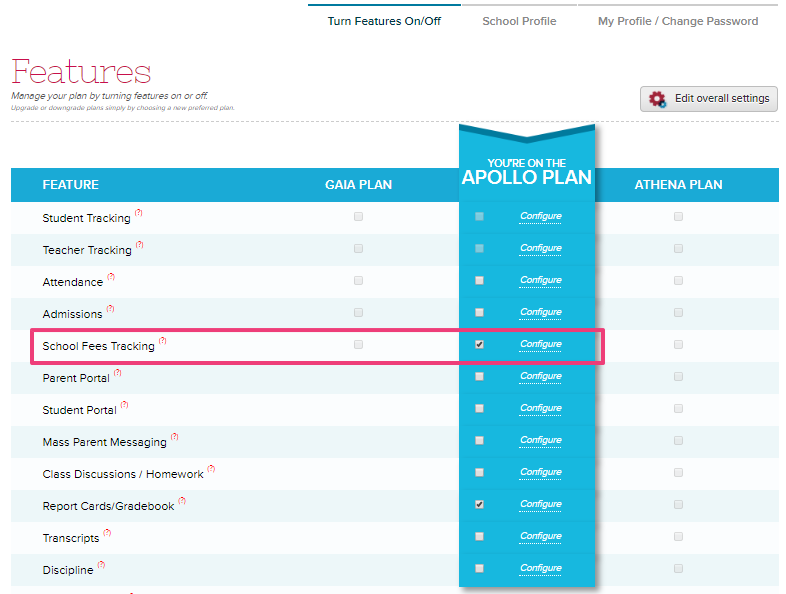
- To turn on the Fee Tracking feature, check the checkbox in the School Fees Tracking row. The menu bar refreshes and adds the Fee Tracking option.
- To configure the Fee Tracking features, see Setting General Fee Tracking Preferences.
Accessing the Fee Tracking Page
To access the Fee Tracking page, click Fee Tracking at the top of the page.
![]()
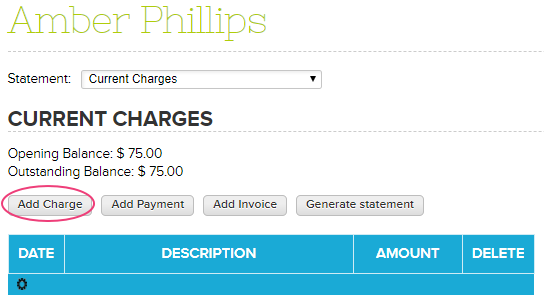
The Fee Tracking page opens and the Student Billing table is displayed. The Student Billing table shows a list of students and their outstanding balances.

Click on a student name (or anywhere in the row) and you'll see the charges and payment details for the students.

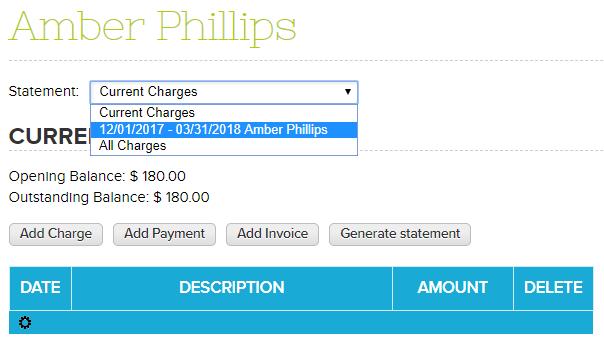
You can also change how charges are viewed. Select one of the following views:
|
Current Charges |
Only shows charges that have not been included in a statement. Any charges before the date of the latest statement will not be shown in this view. |
|
All Charges |
Shows all charges and payments. |
|
Charges by Statement |
Shows charges by statement and amount. |
Adding and Deleting a Charge
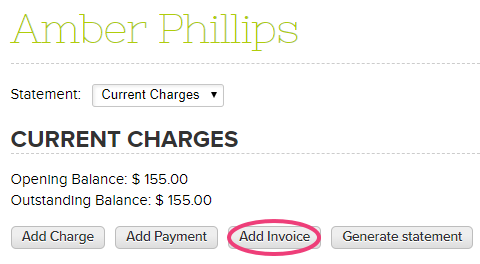
- From the Student Billing table, click on the name of the student whose account you want to add a charge for. The student's billing account opens.
- Click Add Charge.
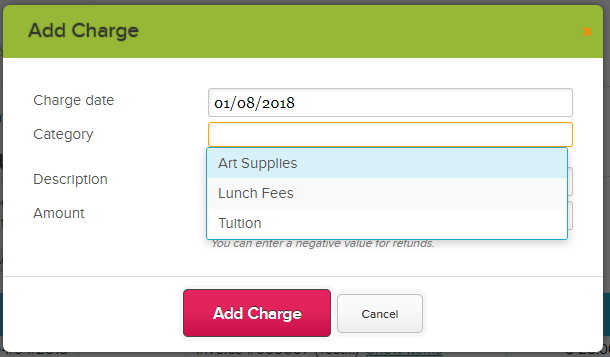
- Enter the date, description and amount. Note: You can only select a date that occurs after your last generated statement. If you enter a date after the statement date, the charge can no longer be deleted.
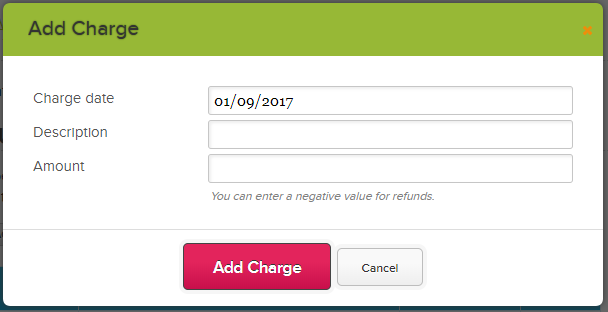
- If the Category field is enabled, you can click one or more from the drop-down list. For more information, see Setting Up Fee Categories.
Added charges will automatically show up in the billing table. To delete a charge, simply click the delete link as seen below:
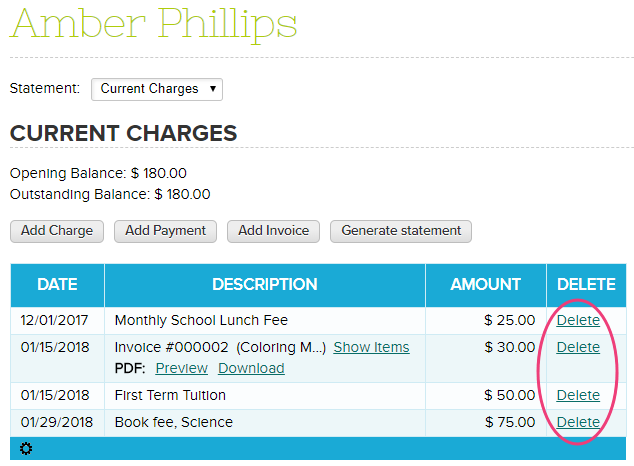
Charges can only be deleted from a student account until a statement has been generated. To reverse a charge under a statement, you can issue a refund.
Adding and Applying a Standard Charge
If you want to apply charges for multiple students, you can do so via the Standard Charges tab. First, you have to add a standard charge.
To add a standard charge, simply click the “Add Standard Charge” button and fill out the Standard Charge fields accordingly.
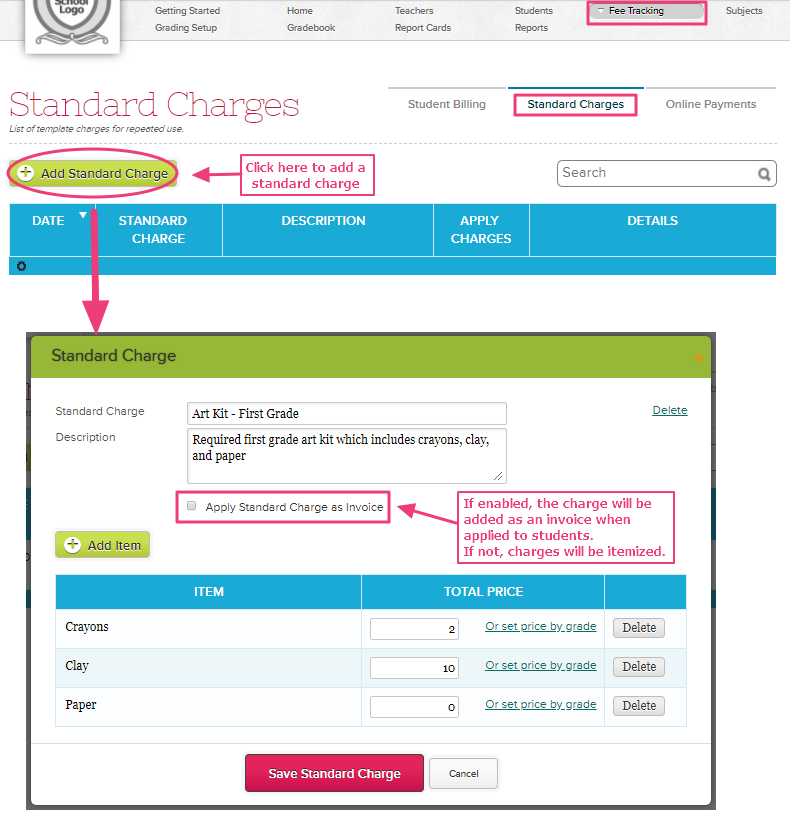
You may add one or more items in the list above; these are the charges that will be applied at once later on.
Click “Save Standard Charge”; you’ll then see the standard charge on the list. To apply the standard charge, click the Apply button. The Charge Students dialog box will appear.
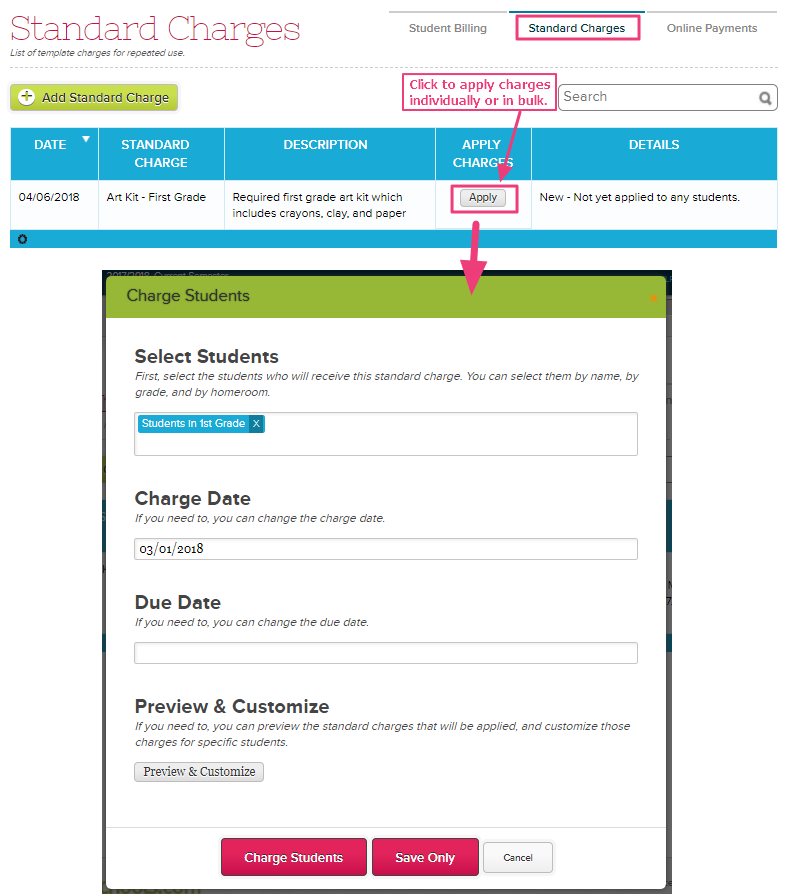
From the list, select an individual student or set of students like “Students in 1st Grade”. Add a Charge date and Due date (optional). You can also preview and customize the charges as necessary.
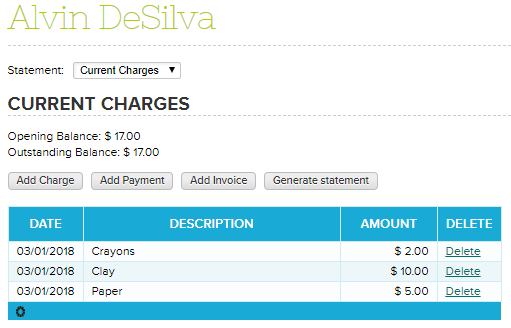
In the student billing page, the items you have listed in the standard charge will appear individually.
If the standard charge is applied as an invoice, only the total amount will be shown in the Amount column:
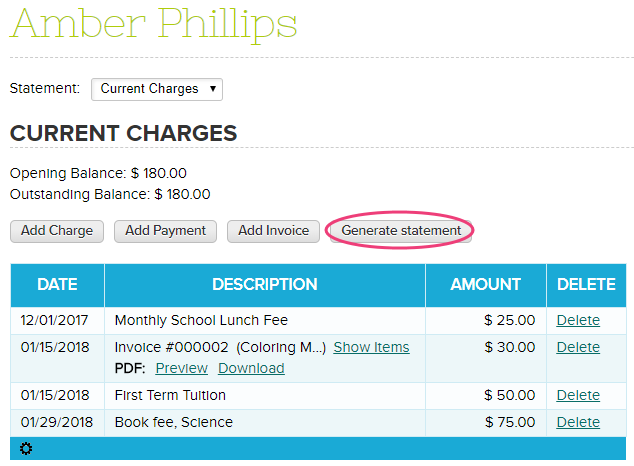
Generating and Deleting a Statement
You can generate a PDF statement from a student's account. Statements in QuickSchools are more closely akin to a credit card statement i.e. both charges and payments are displayed in chronological order for the readers' easy reference. Once the statement is generated, you can preview or download the PDF. In order to view your PDF statement, you need to have Adobe Reader installed on your computer. Go to Adobe.com for the latest Adobe Reader software.
When you create a statement, it includes all the charges, payments, and refunds within the specified date range.
- From the Student Billing table, click on the name of the student whose account you want to generate a statement for. The student's billing account opens.
- Click Generate Statement button.
- Enter the Start and End dates and a name for the statement. Only charges within the specified date will be included in the statement. The name of the statement is auto-generated but can be edited as necessary. You also have the option to email the statement upon generation and enter an optional message.
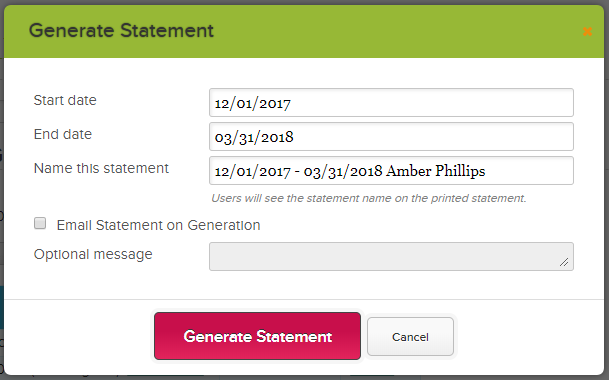
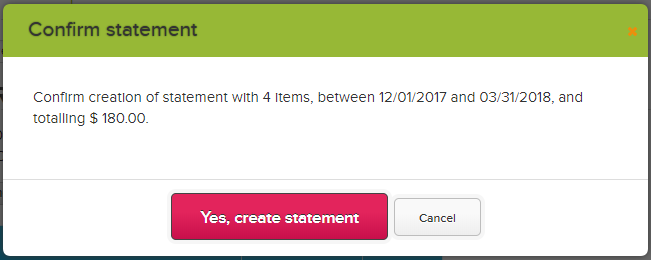
- Click Generate Statement. A confirmation box will appear with the number of items and total amount. Review and click Yes, create statement afterward.
- Current Charges view will be cleared and all charges within the statement date range will be transferred to the generated statement, which you can select from the drop-down.
Generated Statement will look like this:
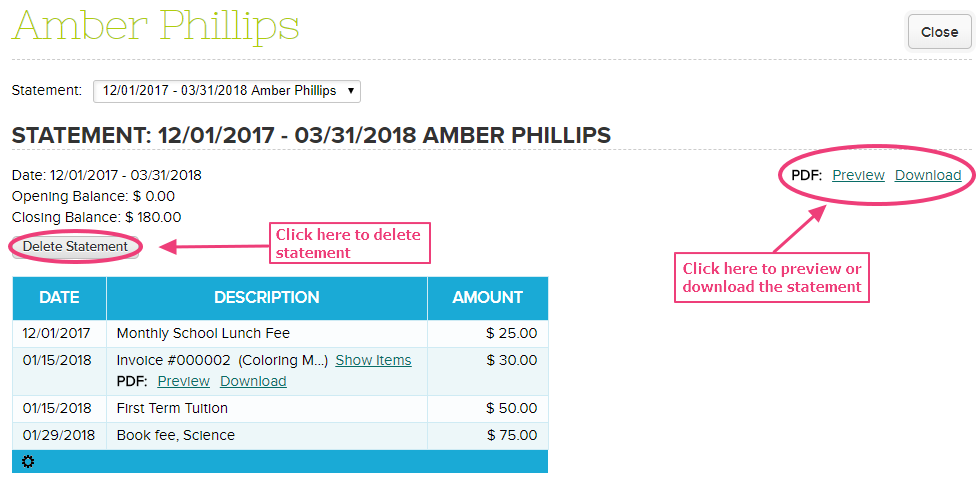
To delete a statement, simply click Delete Statement button on the statement page. Deleted charges and payments will re-appear on the Current Charges screen.
Note: You can generate statements for multiple students at once, as well as email students’ latest statements to parents and print statements in bulk.
Recording and Deleting a Payment
- Click Add Payment. The Add Payment dialog box opens.
- Enter the date, description and amount then click Add Payment.
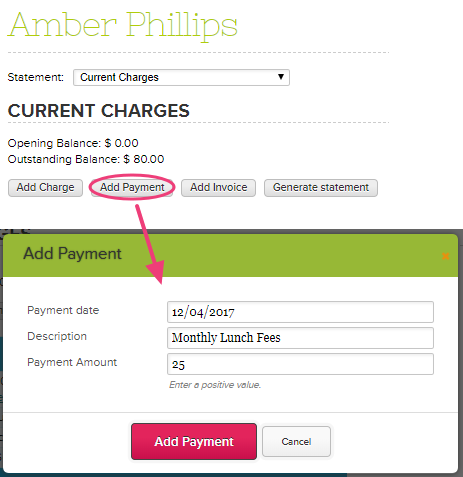
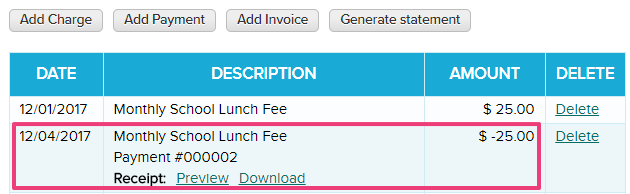
- The payment will show as a negative number in the Amount column and be subtracted from the outstanding balance due.
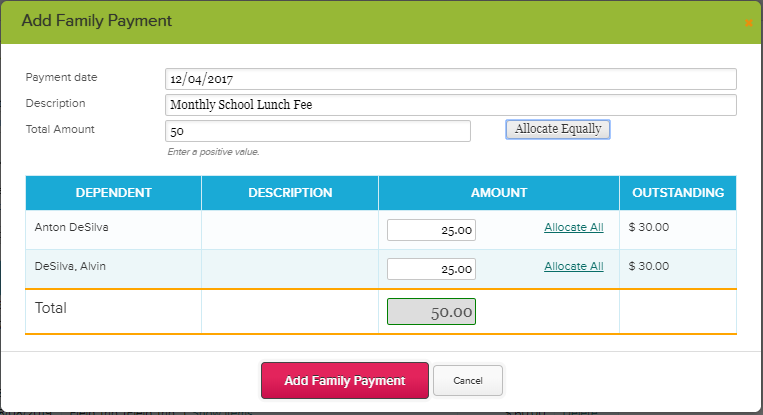
For Family billing, if due dates and payment allocations are turned on, you will need to allocate the payments per student upfront. This is useful for families with more than one child. You can allocate the total amount equally, allocate entire payment for one student only or enter different amounts depending on the current charges.
Payments can be deleted from a student account until a statement is generated. To reverse a payment after a statement has been generated, you can add a new charge, delete and re-generate a statement or issue a refund.
On the Current Charges screen, just select Delete on the row that needs to be deleted. NOTE: Payment numbers are auto-generated, so once a payment is deleted, you can no longer use the same number in case you want to update an incorrectly entered payment.
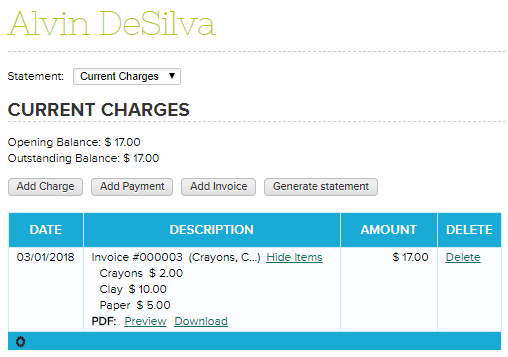
Adding and Deleting an Invoice
Invoices are grouped charges. For example, Art materials may include sub charges such as coloring materials, papers, etc. These may be entered together as one. Invoices always function as debits from the account.
To add an invoice, simply click the Add Invoice from the Current Charges screen.
Click Add Item to enter item name and amount. The total amount is automatically calculated.

Once saved, the invoice should appear like this:
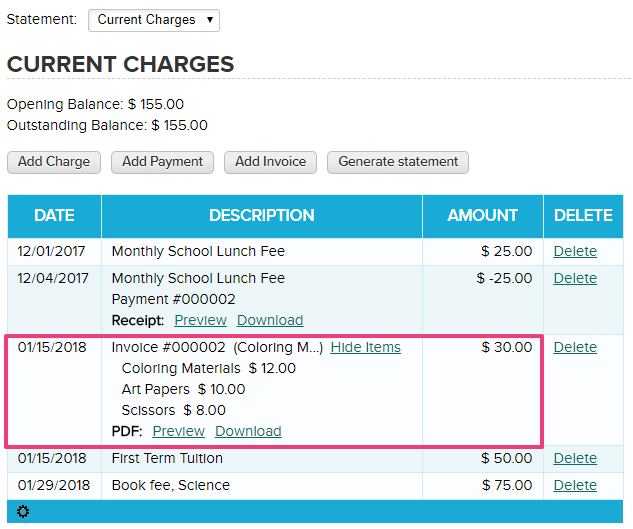
You can preview or download the invoice in PDF format.
Just like charges and payments, invoices can only be deleted if it is outside a generated statement. To reverse an invoice after a statement has been generated, you can add a new charge or delete and re-generate a statement. Invoice numbers are also auto-generated.
For more information about the difference between statements and invoices, click here.
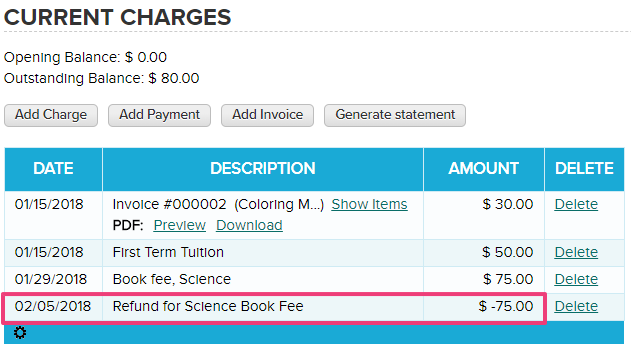
Issuing a Refund
- From the Student Billing table, click on the name of the student whose account you want to credit. The student's billing account opens.
- Click Add Charge.
- Enter a date and description. On the amount field, enter the refund amount as a negative number. For example, if you want to refund $75.00, enter -75.00. You do not need to add a currency symbol.
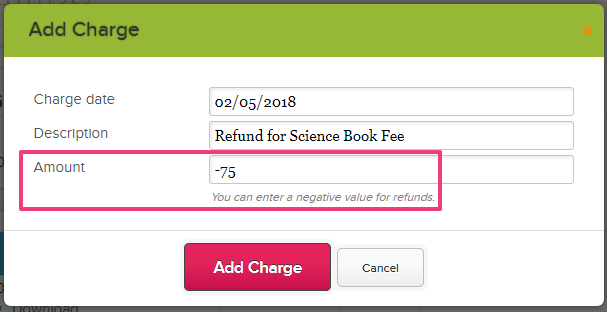
- The payment will show as a negative number in the Amount column and be subtracted from the outstanding balance due.
Note: You can also import fees from an excel file. For more information, click here.
18MR0406