The Students tab is a gateway to a comprehensive database of student-related information, linking basic student directory record information (such as biographical and school-related data and contact information) to related data of interest in categories such as Parents/Siblings, Gradebook, Homework, Attendance, Bills, Medical, Reports and Certificates. QuickSchools also offers administrators the ability to link additional custom fields of their choice to this area of the site.
For teachers, the Students tab is a convenient way to see at a glance which students are enrolled in their classes, as well as follow their progress through the Attendance, Gradebook, and Homework tabs. Parents and students may also find the Student portal extremely useful in keeping track of attendance, homework, and academic development in multiple subjects.
This article offers detailed information about how to configure and utilize student information in QuickSchools. Features described include adding student records manually and via import from Excel, entering or editing basic address and class information, uploading a photo, managing parent and sibling relationships, searching student data, sorting by different categories, managing medical data, uploading certificates, and adding custom fields.
Student Information
- Entering Contact Information
- Editing Student Records
- Enrollment Information
- Editing Biographical and School Data
- Editing Contact Information
- Managing Parent and Sibling Relationships
Student Module Sub-tabs
- Gradebook
- Homework
- Attendance
- Discipline
- Schedule
- Bills
- Medical
- Reports
- Documents
- Custom Fields
- Notes
Accessing the Students Tab
To access the student information tab from your login page, click on the Students link in the gray bar at the top of the screen, as shown:
Now you are ready to add and manage student records! Students can be manually added one by one, or imported as a group from an Excel file.
Adding Student Records
If you are accessing the Students tab for the first time, the page will be empty initially, and will look like this:
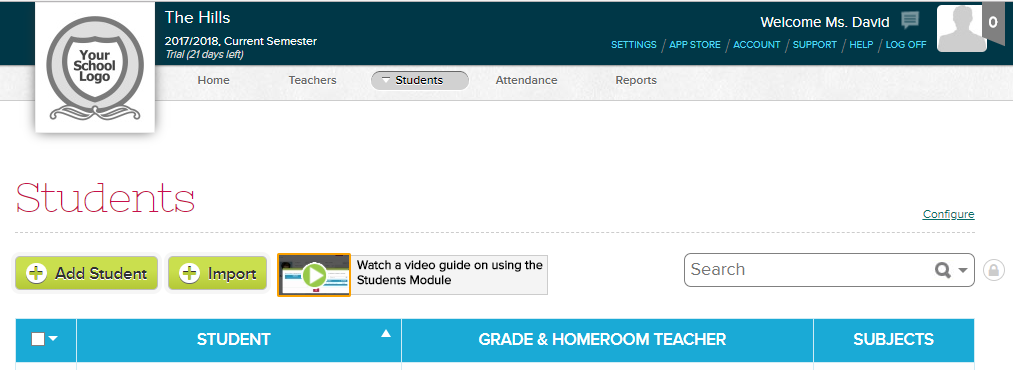
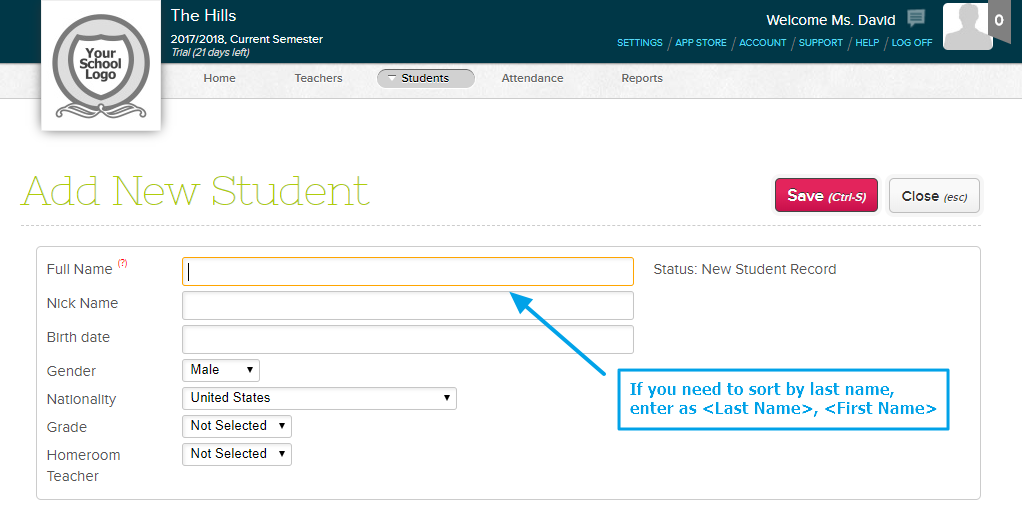
To add a student manually, click the Add Student button. Enter the student's basic information:
You can also bulk add students by importing an Excel file. For more information visit Adding Students.
Displaying and Managing Student Records
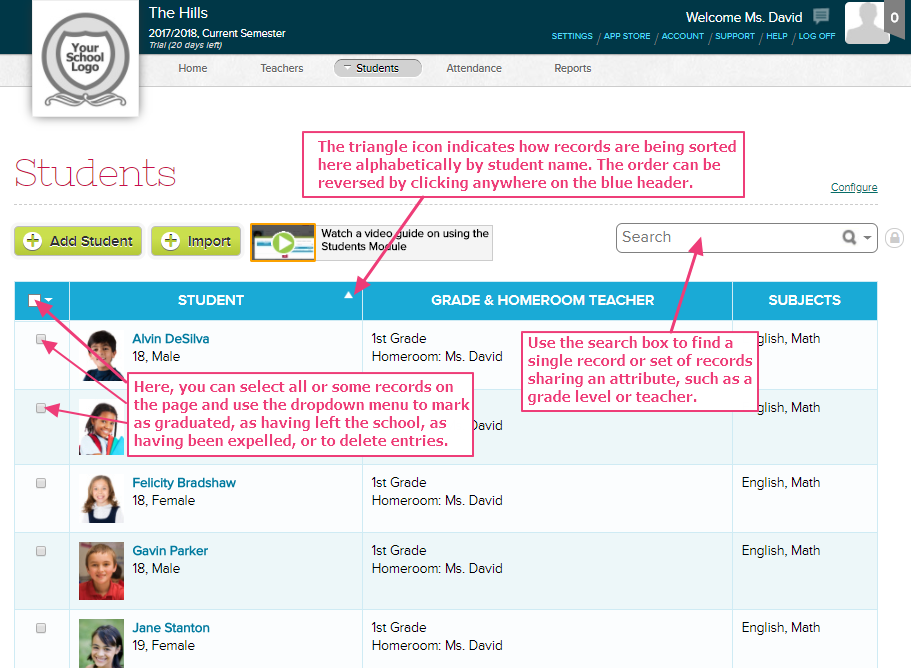
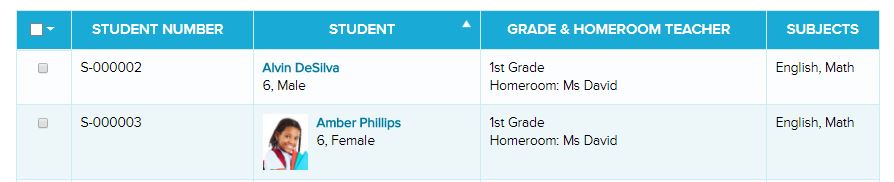
Once you have entered or imported student record data into QuickSchools, your Students tab will list those students on the main page, in alphabetical order by the first letter in the Name field (this means that if you want them to be sorted by last name, you must enter the last name first), as shown below:
Displaying Students in Reverse Alphabetical Order
It is easy to display students in reverse alphabetical order; click once on the blue header labeled Student next to the white triangle and it will reverse to list them from "Z" to "A."
Removing Students from Active Enrolled Status
The checkboxes on the left-hand side of the Students screen can be used to select records and remove them from active enrolled status, either individually or globally.

Use the dropdown menu at the top of the column to globally select all records or deselect all records on the page. The menu can also be used to mark selected students as having graduated, having left the school, or having been expelled. Finally, records can be deleted entirely. Use caution when utilizing this menu as there is no confirmation screen appearing prior to the deletion or status modification of student records. If you erroneously delete or de-enroll a student, you can reverse this action by searching for and entering the student record and either un-deleting it, or changing the enrollment status back to active (see Using the Search Feature and Editing Student Records below).
Using the Search Feature to Display a Subset of Students
If you would like to locate a single student record, or a set of records that share a single attribute (such as students in a particular homeroom or grade level), you can use the search box at the top right of the screen, as shown here in this sample search for first grade students:
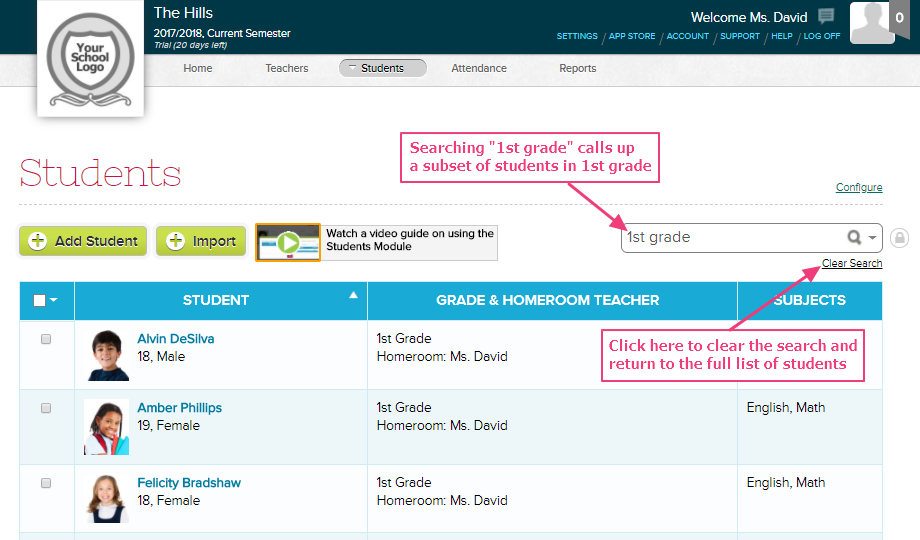
To clear the search and return to the full list of students, click the Clear Search link directly below the search box.
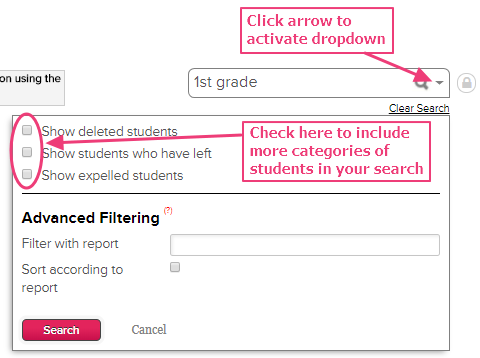
The search feature will automatically pull records from the list of active students. If you would like it to include students who have been deleted, students who have left, and expelled students, you can select those additional categories by checking the appropriate boxes on the dropdown menu activated by clicking on the triangle at the far right of the search box, as shown to the left. When you have made your selections, click on the red Search button to complete the search.
Search returns including deleted records will indicate which are no longer active with the inclusion of the words Status: Deleted in bold below the name of the student, as shown below:
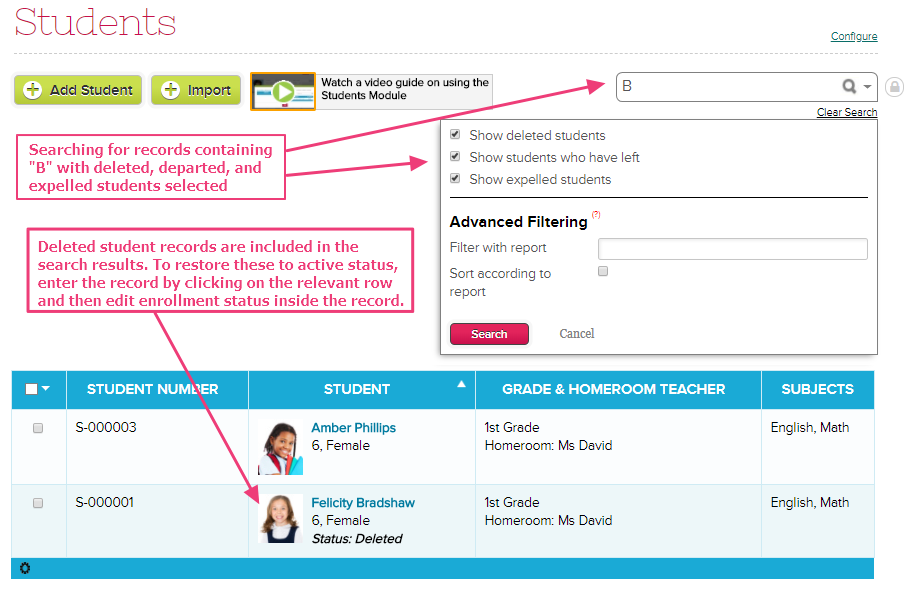
If you wish to undelete or otherwise restore a departed or expelled student to active enrolled status, you must enter the record by clicking on it and using the enrollment menu to change status (see Editing Student Records below for more detailed description of this process).
Student Information
Entering Contact Information
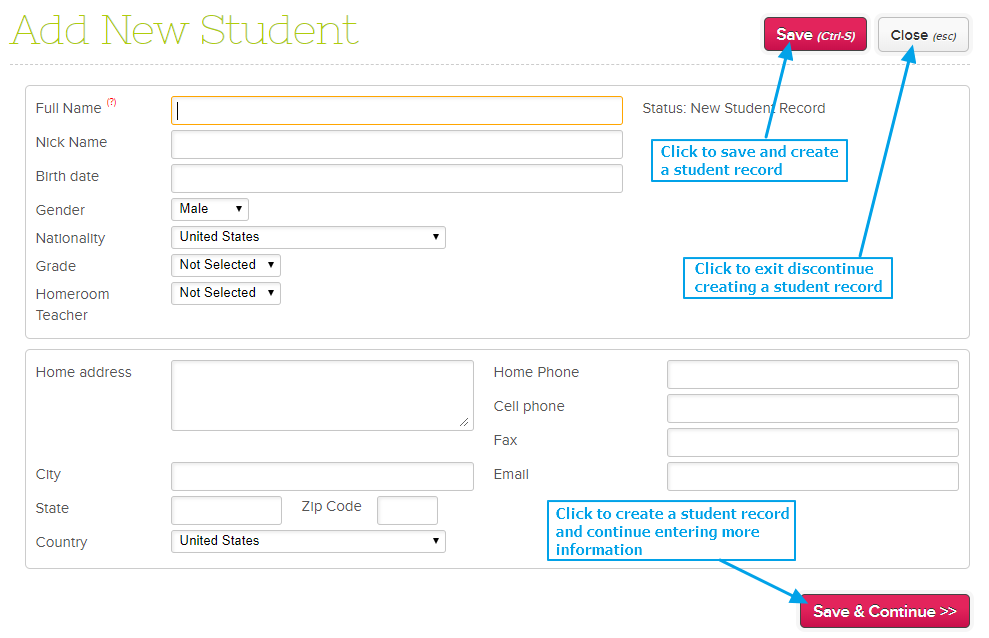
The lower half of the New Student record consists of contact information, including current address, telephone numbers, fax, and email. Filling these fields in completely with accurate information ensures that teachers and administrators can easily contact students and their families when necessary. After all fields have been completed, click on the red Save button or type Ctrl-S.
Should you wish to exit without saving (therefore not adding the student record), you may do so by clicking on the Close button to escape the screen. If you want to continue adding more information like parent names and their contact information, click the Save & Continue button.
Editing Student Records
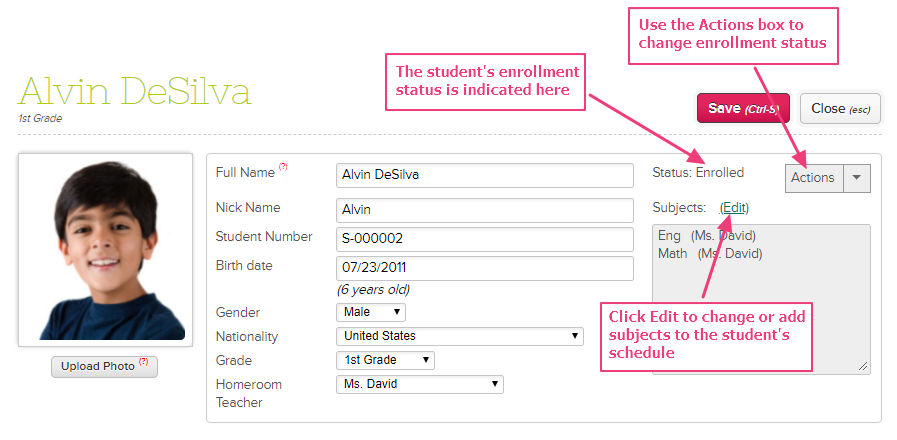
To view and edit an individual student record, click on the desired row on the main Students page. This will bring up the long view of the record, as shown below:
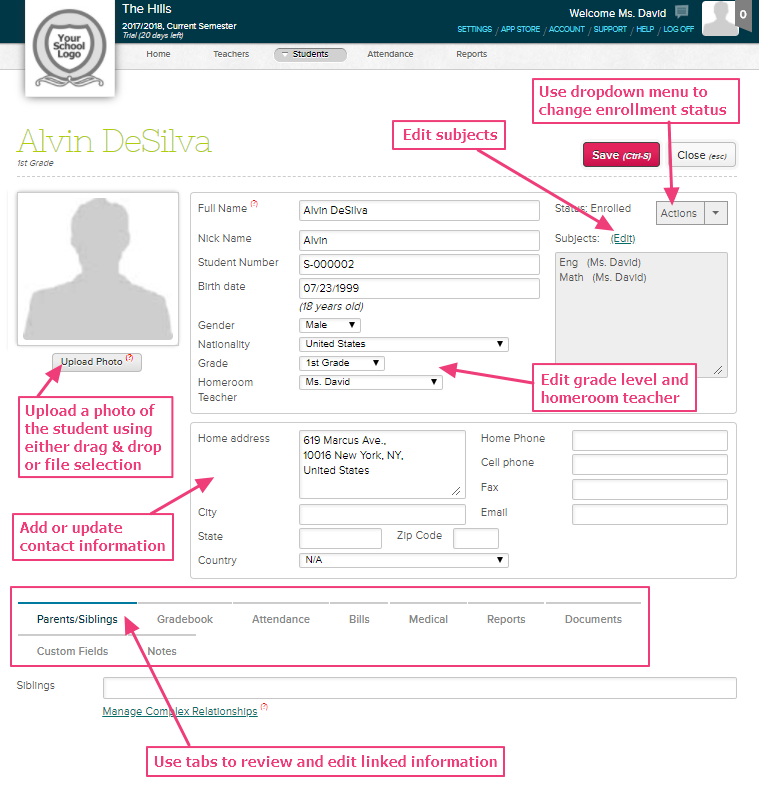
Student records are divided into three sections on the screen. The upper box consists of important school enrollment information and biographical data, the second box contains contact information, and the lower section of the record is organized into individual tabs that associate the student with other records in the database. Information in these boxes may be edited or added, and then saved to the student's record by clicking on the red Save button at the top of the screen.
Now you can add a photo, change a student's enrollment status, modify the subjects in which a student is enrolled, edit biographical and school data (such as gender, birth date, and nationality, grade or homeroom teacher information), and/or update contact information for the student. In addition, tabs at the bottom provide an easy way to link the student's record with other information, such as parent/sibling data, documentation of academic progress, medical records, report cards, and certificates. Custom fields can also be defined and linked to student records.
Uploading a Photo
Adding a photo to a student record is easy! You can either drag and drop the image onto the photo box, or click on the Upload Photo button and select the image from your hard drive.
Then click on the red Save button to associate the image with the student record.
To delete the image, simply mouseover the bottom right corner of the photo box and click on the "X" that appears there.

The image should appear/disappear in the photo box, and also as a thumbnail on the centralized list of records on the Students page, as shown below:
Enrollment Information
Changing Enrollment Status
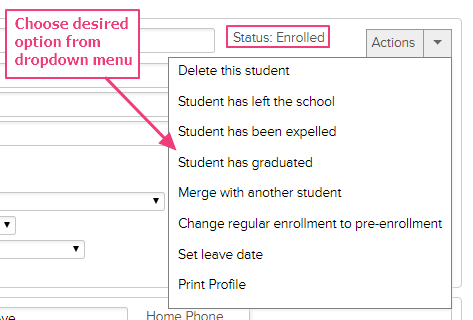
A student's enrollment status may be changed from inside the record through the gray dropdown Actions menu. First, check the student's current status, which is listed at the top of the record in the upper box, to the left of the Actions menu. Then scroll over the menu header and click to display your choices.
If the student has not yet left the school, but is planning to do so at a future date, you can indicate that by selecting Set Leave Date. Selecting this option will cause a Set Leave Date pop up box to appear, as shown:
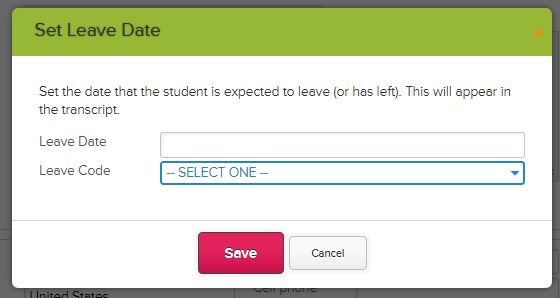
Clicking on the box provided for the leave date will bring up a small calendar for easy date selection. Choose the leave date by clicking on the appropriate day on the calendar, and then the red Save button.
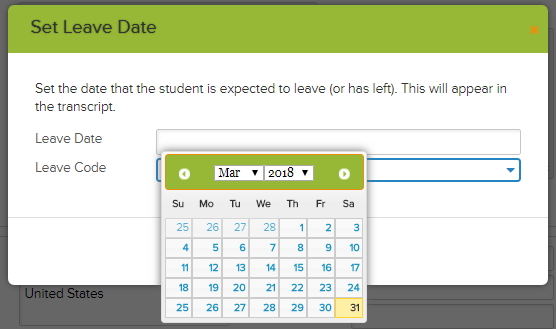
The selected leave date will now appear next to the student's status in the student record, and is also automatically copied to the transcript.
Editing Subject Enrollments
The student record can be set to display the schedule of subjects currently taken by the student, and the name of the teacher of each class. It is easy to change the list of subjects by clicking on the Edit link next to the gray Subjects box:

This will bring up an Edit Subjects popup box that looks like this:
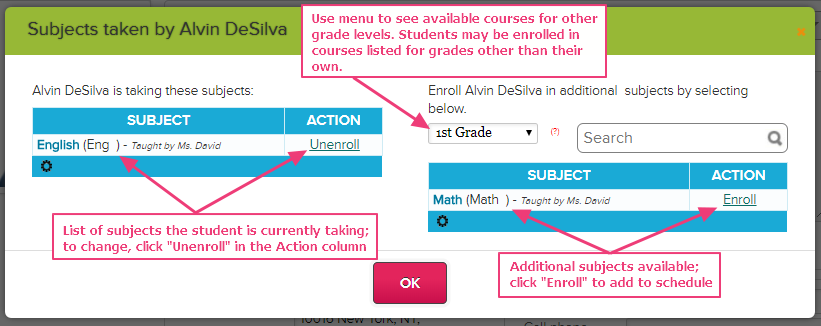
The list of classes on the left side are those in which the student is currently enrolled. You can remove a student from an enrolled subject by clicking on the Unenroll link. Use the table view icon at the bottom to change the number of courses that can be be seen on a single screen.
On the right-hand side of the popup box, we see a list of available subjects for the student's grade level (in this example, 1st grade). Clicking on Enroll next to the available Math class will enroll the student and move the subject to the left side, adding it to the list of enrolled subjects, as shown:

You may find additional subjects to add by either changing the grade level in the drop-down menu, or using the Search box. Students may be enrolled in courses listed for any grade level, with permission from the instructor or administrator. Don't forget to click on the red OK button to save any changes you have made to the student record.
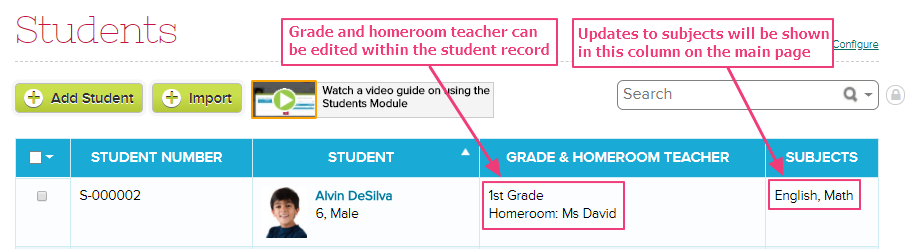
Now the updated list of subjects will appear in the Subjects column on the main page:
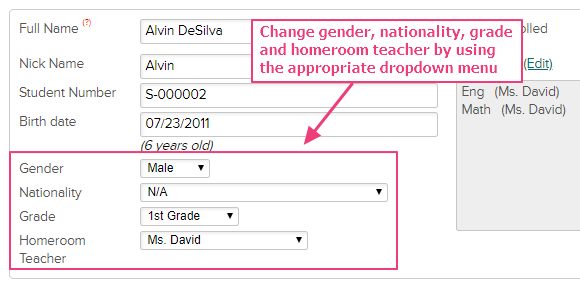
Editing Biographical and School Data
Note that the student's grade level and homeroom teacher are also visible on the main page; these fields can be edited in the upper box of the long view of the student record as well, along with fields for the student's birth date, gender and nationality:
Editing Contact Information
The second box displayed in the long view of the student record consists of contact information, including current address, telephone numbers, fax, and email.
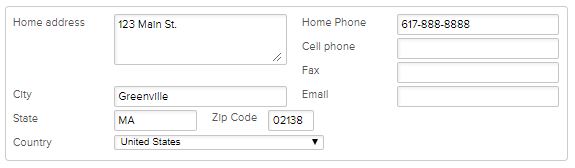
Filling these fields in completely with accurate information ensures that teachers and administrators can easily contact students and their families when necessary. After all fields have been completed, click on the red Save button or type Ctrl-S.
Managing Parent and Sibling Relationships
The Parent/Siblings tab enables the student's record to be linked to sibling records and parent information, including emergency contact information, and designation of people eligible to pick up a child from school.
Adding Siblings
To add siblings, place your cursor on the Siblings box. This will bring up the comprehensive list of students in the database as a drop-down menu, from which siblings can be selected, as shown:
Selected siblings will appear in the Siblings box, as seen below:
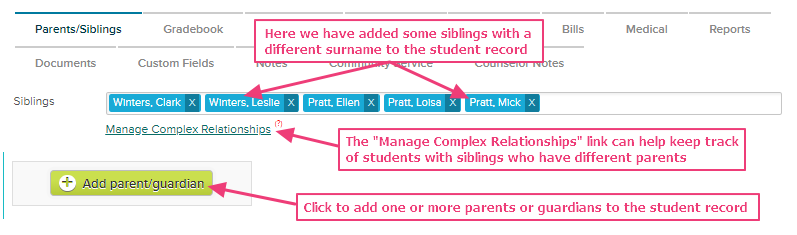
Adding siblings will automatically associate the parents of the selected siblings with the current student record. Now you can add additional parents and guardians, and designate complex relationships between siblings with different parents.
Adding Parents and Guardians
To add a parent or guardian to the student record, click on the Add parent/guardian button at the bottom of the page.
Then fill out the parent form, including relationship to the student, contact information, and communication preferences. The parent/guardian record should also designate whether the parent or guardian is authorized to pick up the student from school and/or is an emergency contact for that student.

After completing the parent/guardian form, don't forget to click on the red Save button to associate the new parent or guardian information with the student's record.
Managing Complex Student-Parent Relationships
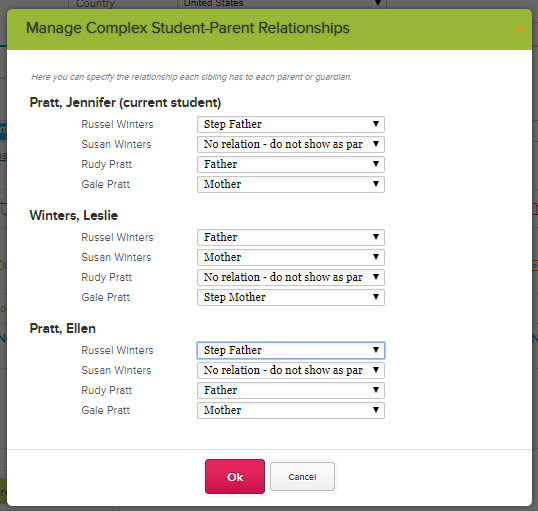
In recognition of the fact that many families today are blended or contain complex sibling and parent relationships, QuickSchools makes it possible to designate specific relationships between siblings and parents. To use this feature, click on the Manage Complex Relationships link located directly under the Siblings box.
This will bring up a Manage Complex Student-Parent Relationships box listing the student and all siblings linked with that student. The identities of associated parents or guardians can be specified in relationship to each child in the family, using the drop-down menu provided. Click on the OK button to save the selected relationships.
Student Module Sub-tabs
Gradebook
The Gradebook tab on the Students information page is one of the most valued features of QuickSchools, because it enables students and their families to see at a glance how the student is doing in his or her classes. Grades from previous terms can also be viewed through this tab if available, by selecting the relevant semester from the drop-down menu at the top left of the page.
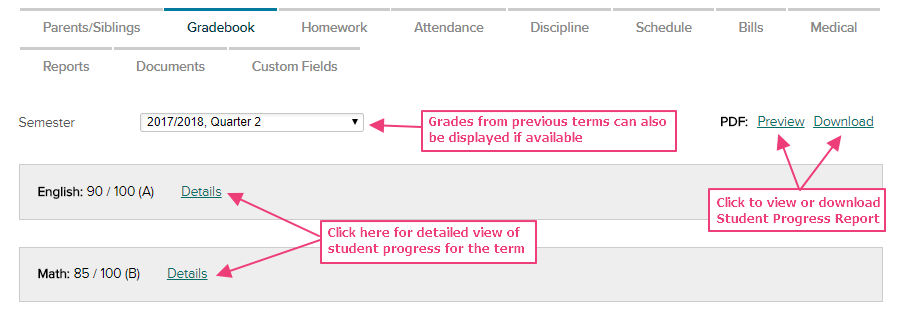
A detailed view of the student's grades and teacher comments for each subject can be seen by clicking on the Details link to the right of each course name. This will display the comprehensive table of the student's grades identical to those entered into the teacher's Gradebook:
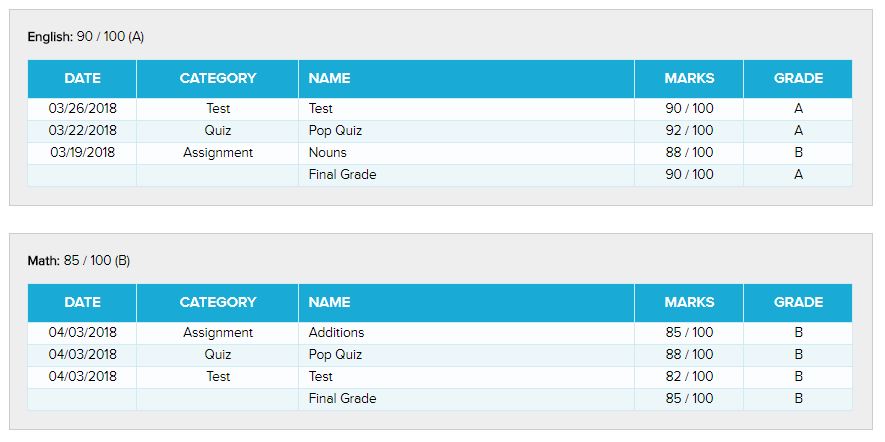
Not only does the Gradebook tab display scores and teacher comments entered into the Gradebook for each of the student's subjects, but it also centralizes all grade information into an easy-to read Progress Report which can be viewed or downloaded as a PDF file:

This is a convenient document that can be printed and filed for your own records, and can be used to help chart student progress in one or more subjects over time.
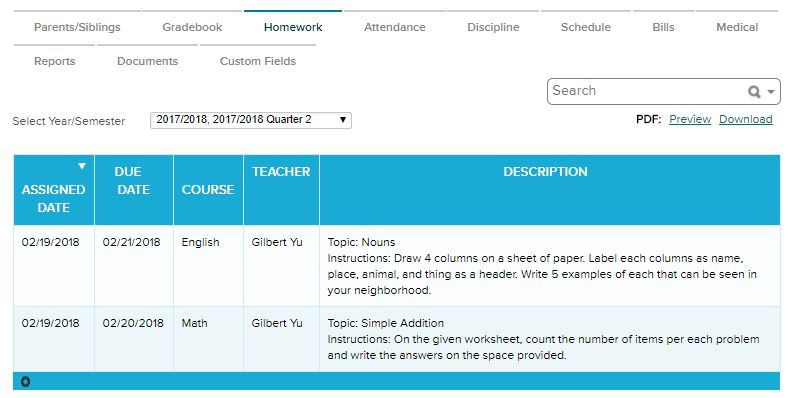
Homework
The homework tab is where users can see student’s homeworks and assignments for each subject. For more information, see Managing Homeworks.
Attendance
The Attendance tab displays the student's cumulative attendance record, displayed in both numerical totals, via a color-coded pie chart with percentages of tardiness and absences, and via monthly calendar:

This makes it easy to track absences and discover patterns in tardiness that may be adversely affecting the student's performance. Attendance may be taken by Homeroom, by Period or by Subject. For more information, check out our article on how to take attendance.
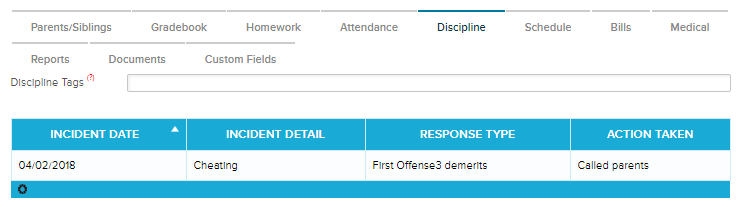
Discipline
The Discipline stores all incidents the student has incurred for the duration of his stay in the school.
Schedule
The Schedule tab shows the subjects the student is taking and the schedule per day, based on the schedule the school administrator has created in Scheduling module.

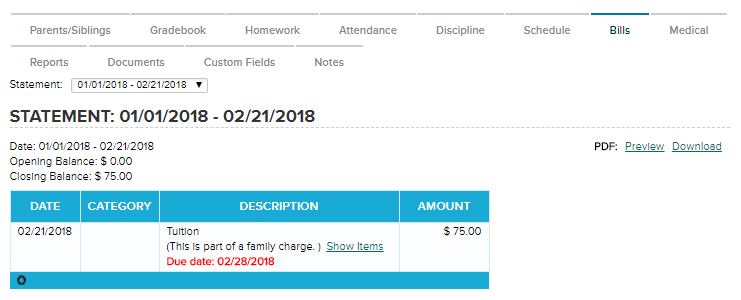
Bills
The Bills tab shows the student’s current balance and statements from Fee Tracking.
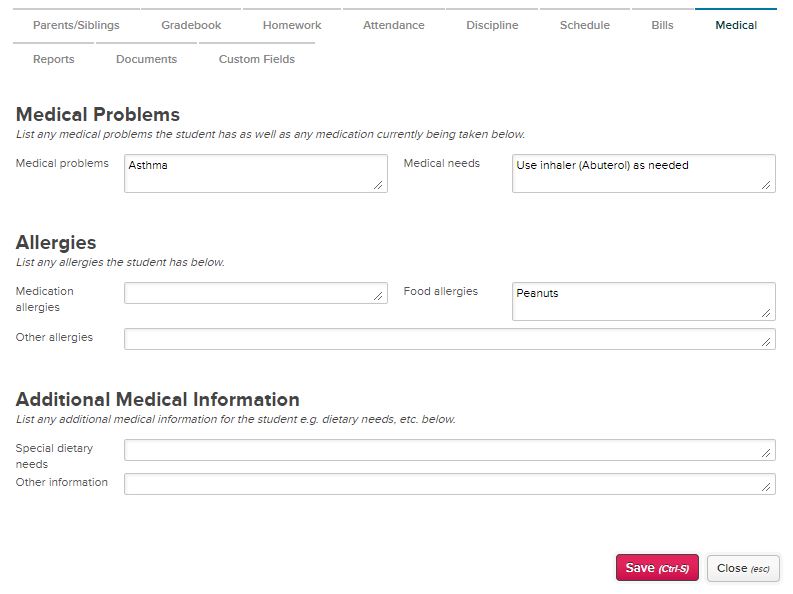
Medical
The Medical tab is a place to keep records of vital student medical and allergy information. Enter data on relevant fields in the record:
Reports
The Reports tab displays the list of available report cards for each student. You may change the order of the list by clicking on the appropriate dark green border of the column by which you want to sort. Don't forget to save your changes by clicking onthe red Save button at the bottom of the page when finished.
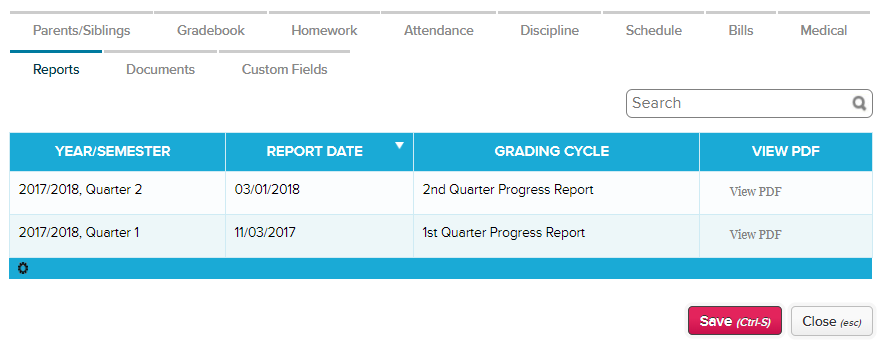
The downloadable report cards will become available after the end of the term. It will display attendance records and comments as well as final grades in all subjects:
Check out our Report Cards Guide to know more on how to set this up.
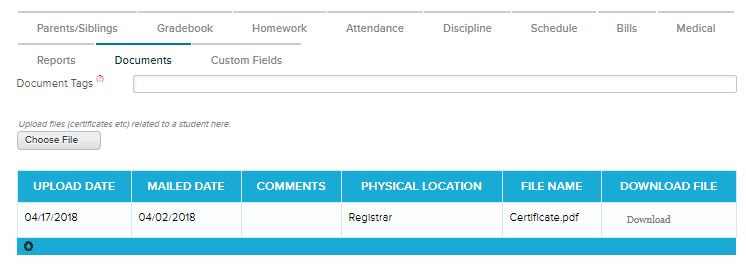
Documents
The Documents tab may be used to upload an existing certificate document to keep with the student record.
Custom Fields
The Custom Fields tab may be used by an individual school to create data fields of specific relevance to their situation. For example, a custom field has been created here to link the student's record to a particular bus district:
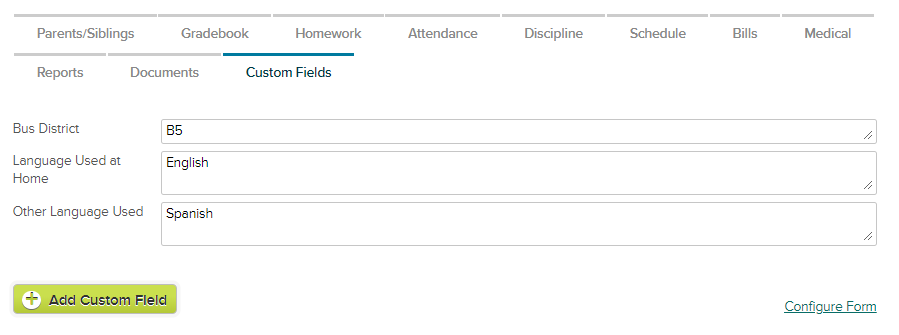
By default, these information are hidden to students and parents. Only the school admin has access and can give permission on who can view and edit each custom fields as well as which fields to display and search on the student list.
Notes
Student Notes allows specified users to add any kind of text-notes for students' records.
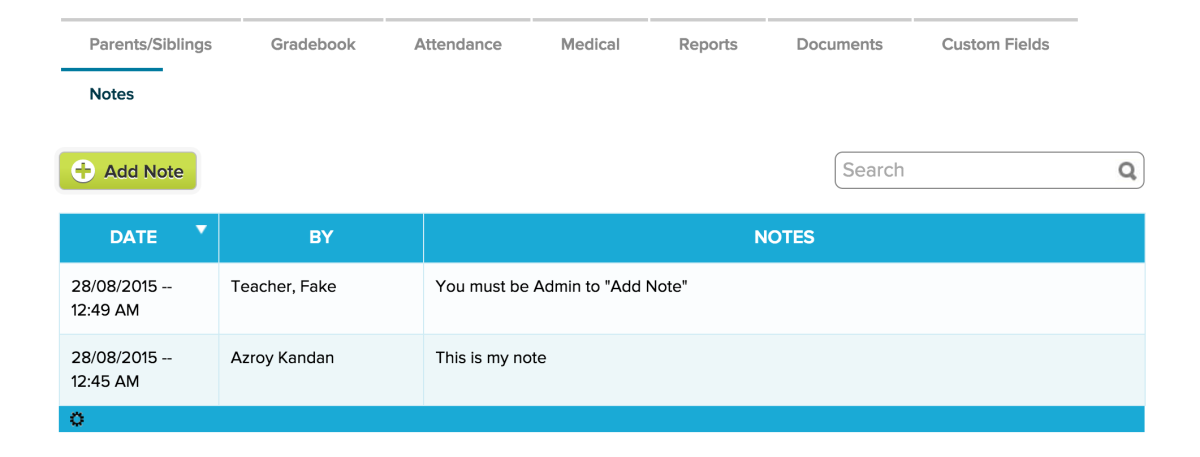
See Turning On the Student Notes for more information.
If you have questions, feel free to chat with us or email us at support@quickschools.com.
18MR0417