The Admissions Module is a simple, and convenient way to record and track potential students from their first inquiry to enrollment. Admission information can be recorded according to default parameters or customized to reflect different admissions status. In addition, Semester Management, is controlled in this module.
This article offers detailed information on configuring and using all features of the Admissions Module. These include:
- Accessing Admissions Module
- Inquiries
- Adding a new inquiry
- Editing/updating inquiries
- Converting an Inquiry to Application
- Searching for Inquiries
- Applications
- New Application without Inquiry
- Adding Custom Fields
- Searching for Application Forms
- Enrolling Students
- Email Feature
- Status Codes
- Semester Management
- Admissions Reports
First, enable the Admissions module via SETTINGS > Turn Features On/Off > click the Admissions check box > click Configure link to set up access.
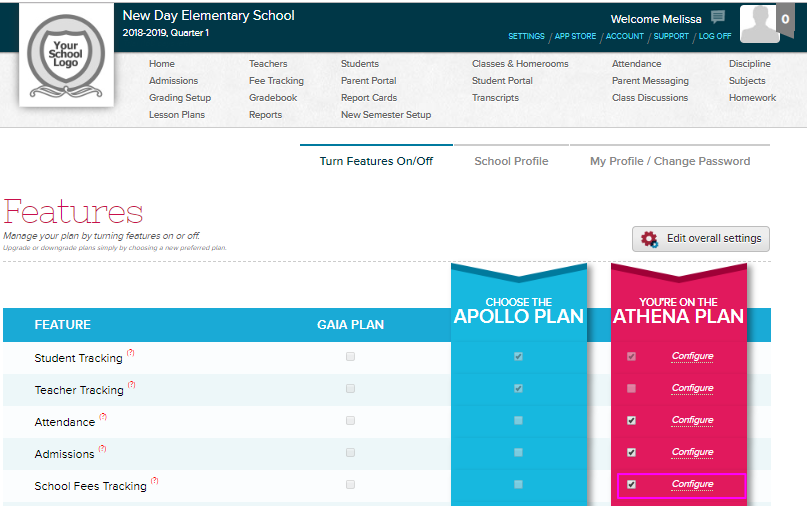
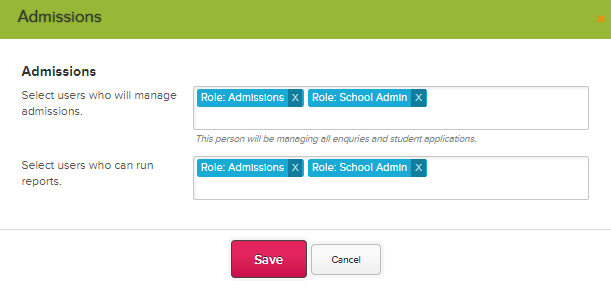
On the configuration pop-up box, enter the users or roles who will manage the module and access to reports.
From the example above, the Role: Admissions is a custom role that was created from the School Profile page. If you would like to create your own school roles, check out our Managing User Access article.
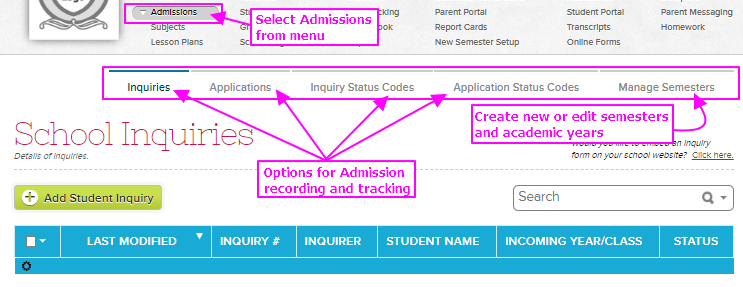
Accessing the Admissions Module
Locate the Admissions tab from the gray menu bar at the top.
The modules consists of:
- Inquiries
- Applications
- Inquiry Status Codes
- Application Status Codes
- Manage Semesters
Inquiries
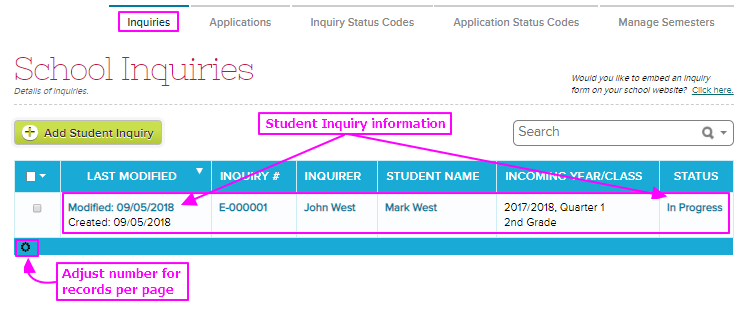
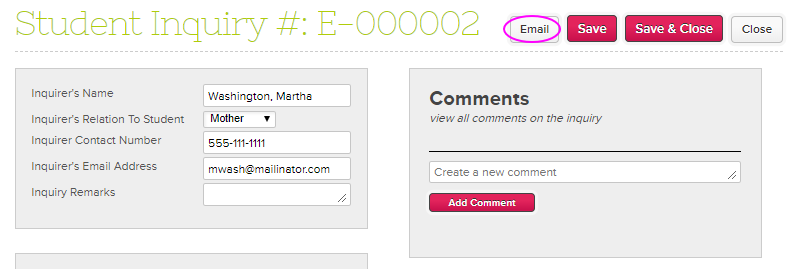
Student Inquiries is an effective way to record and track potential students from first contact to application. Each new Student Inquiry is assigned an inquiry ID starting with E(Enquiry) and numbered in sequential order. Shown below is an overview of the Inquiry Page.
Adding a New Inquiry
Adding a new Student Inquiry is accessed by choosing "Admission" option in menu at top of page, followed by choosing the "Inquiries" tab. Click the Add Student Inquiry button.

This brings up the "Add Student Inquiry" Screen which allows for the recording of all pertinent information relating to both the individual inquiring about the school and the potential student. To ensure consistency throughout all the modules: Student and Inquirer's Name should be entered as LAST NAME, FIRST NAME.
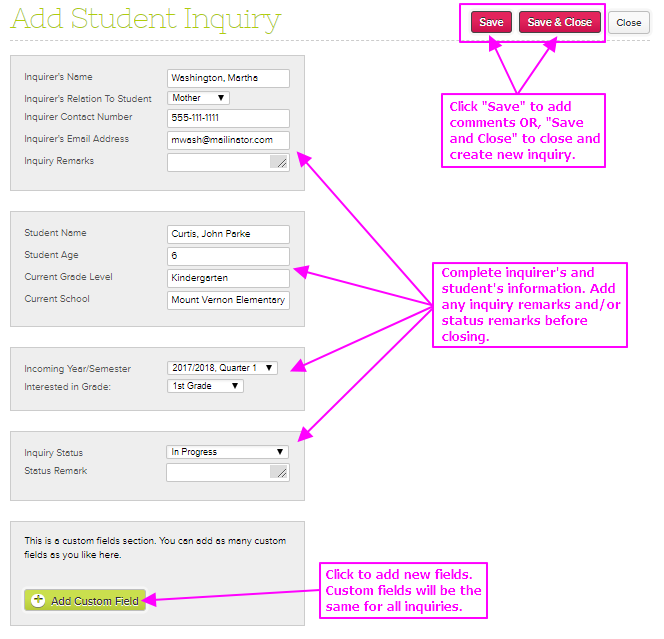
"Inquiry Status" is a KEY element in tracking students through the admission process and in admission reports.
Editing/Updating Inquiries
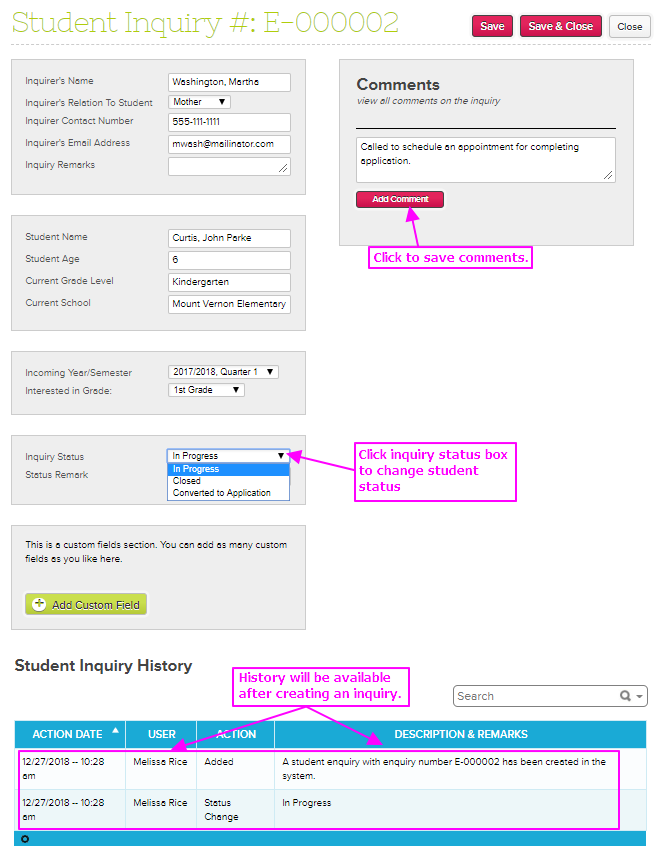
Student Inquiry status may be updated, comments added, status remarks included, or changes to student's information at any time. To update or edit Student Inquiry information click on the Inquiries tab in the Admissions Feature and choose the Student's name . All of the Student's information will be displayed. Any changes or updates may be recorded including Inquiry Remarks, Comments and Inquiry Status. Click red "Save" button when done.
Converting an Inquiry to Application
For consistency and to avoid duplicate records a Student Inquiry must be converted to an application. This is accomplished by choosing Inquiry Status in the Student Inquiry record and clicking on "Converted to Application". An Application record will automatically generate issuing a new Student Application Number.
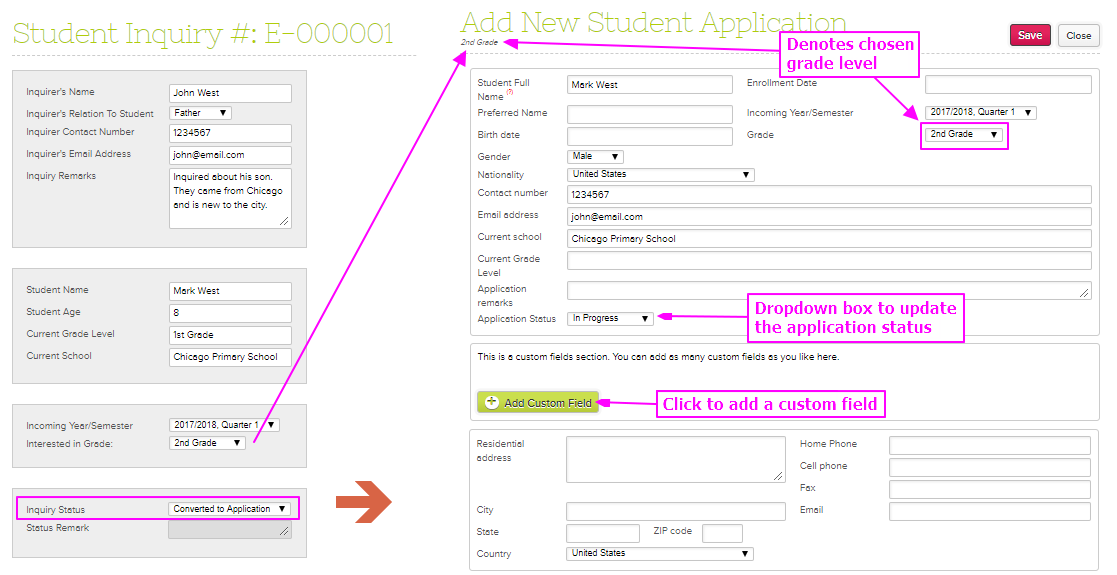
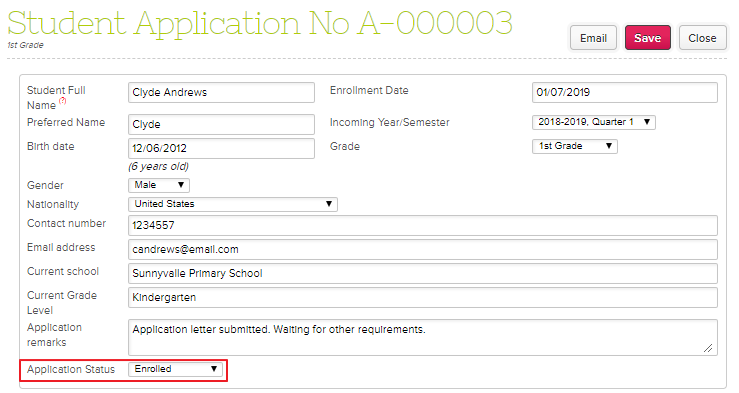
Below is an overview of the Student Application. Please note when converting an Inquiry to an Application the inquiry number changes from an E(Enquiry) to A(Application) and is numbered in sequential order.

Continue to add new information like the Enrollment date, Current Grade level, etc. which are not included in the submitted inquiry form.
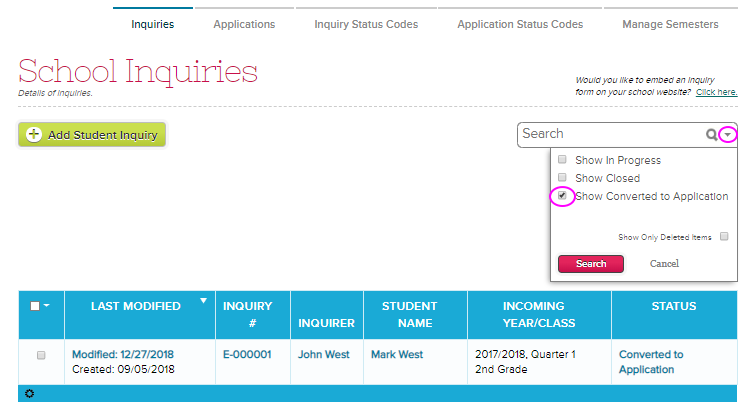
Searching for Inquiries
By default, only “In Progress” inquiries will be shown on the list. To search for closed inquiries or converted to application, click the inverted triangle inside the Search box > click Search button.
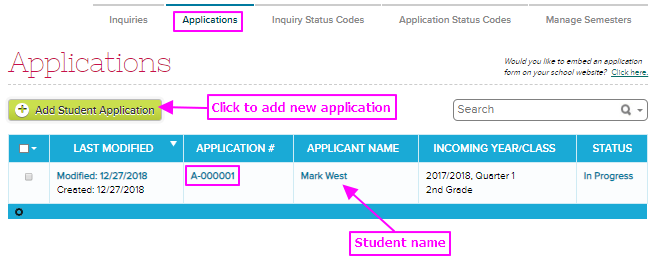
Applications
Applications allows comprehensive recording of students' personal, residential, and medical information. As with Student Inquiries, Applications track and update students' Application Status. An application may be generated from either an Inquiry or from within the Application page. The Applications Page contains the following information:
New Application without Inquiry
A standalone application may be generated when no Inquiry was recorded by choosing "Applications" tab in Admissions Module then clicking on green "Add Student Application" button.
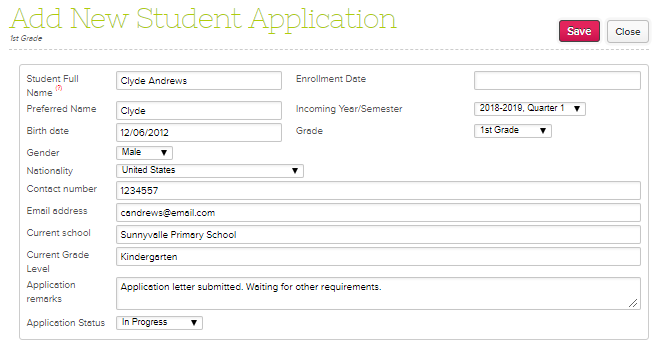
Student and administrative information are contained within the first section of the Application. When "Grade" is chosen, it will also appear at top of application.
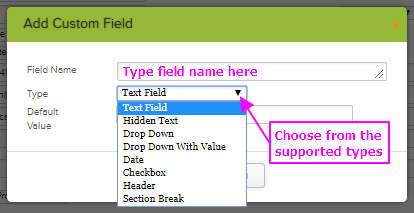
Adding Custom Fields
To add a Custom Field of information click on the green "Add New Field" button. Enter a new field Name and select the type. This instruction also applies to custom fields in Inquiries.

The custom fields should also be manually added to the student record under the Custom Fields tab so that the values will appear after enrollment. Check out the Students Module Guide for more information. While parent information that is added as custom fields can be copied over to the student record and appear under the Parents/Siblings tab, mapping the fields to the parent information can only be done on our end. Kindly email us at support@quickschools.com so we can set this up.
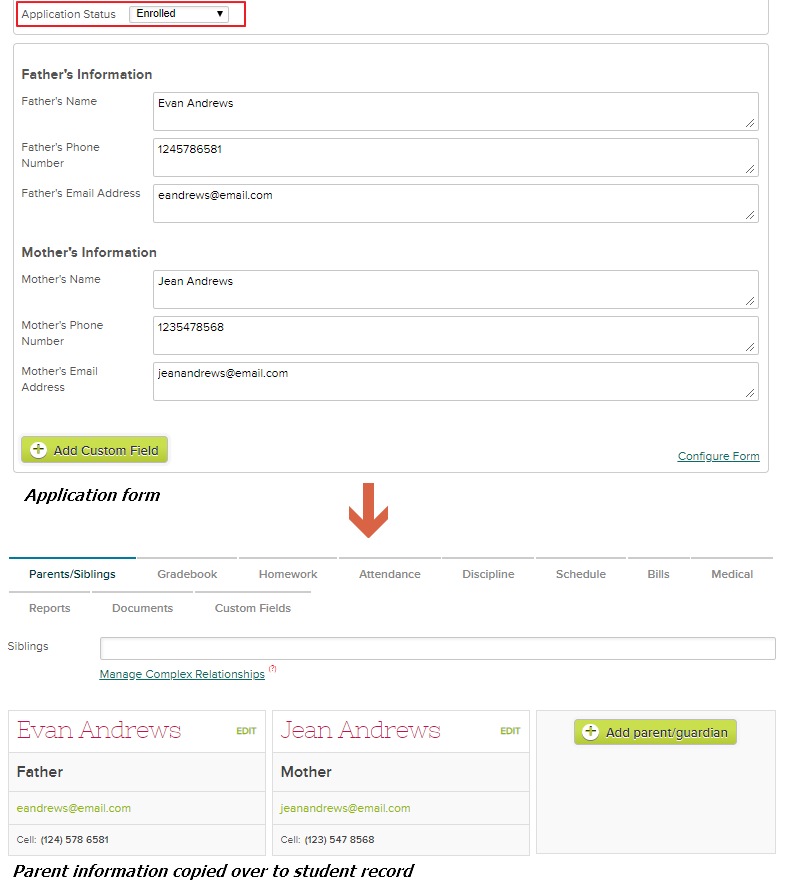
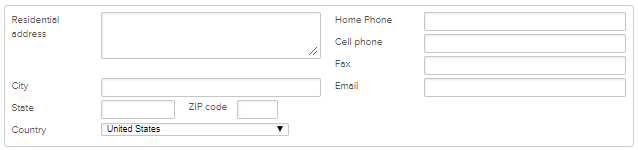
The second section of the application consists of Residential and Contact information. No additional fields may be added. All values will be copied over to the student record upon enrollment.
On the third section, documents such as certificates, letters, etc. can be uploaded and transferred over to the student record under Documents tab upon enrollment.
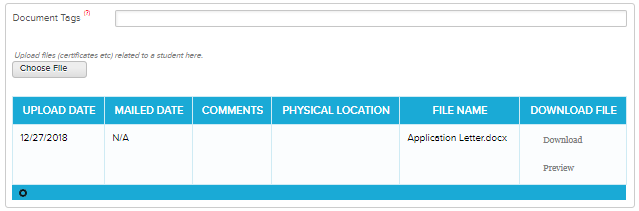
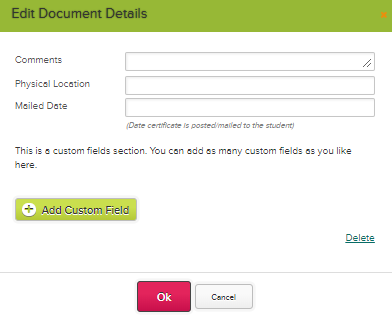
Click on the uploaded document to edit the details. You can also add custom fields for additional information.
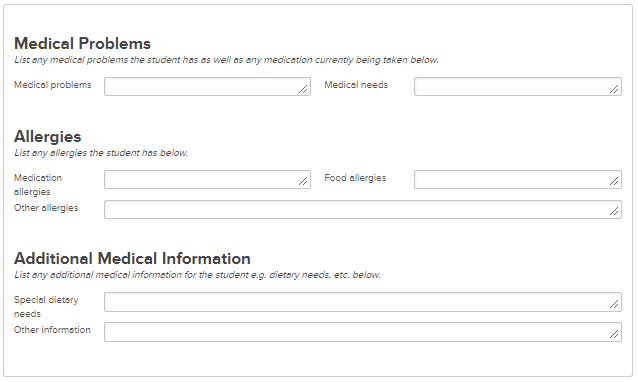
The final section of the application contains Medical Information for the student such as medical needs, food/medication allergies, and dietary needs.
Enrolling Students
Enroll students by changing the Application status from “In Progress” to “Enrolled” > save the form.
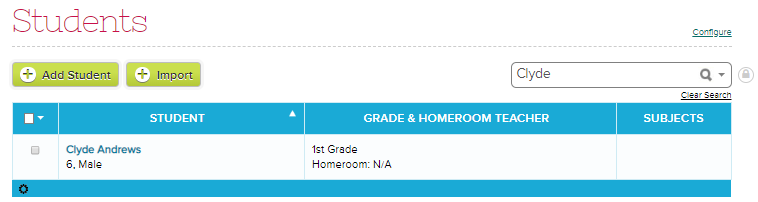
This will automatically create a new student record on the Students module. You can now assign the student to a homeroom and enroll him to subjects.
Searching for Application Forms
To search for application forms that have been Enrolled, Rejected, Approved, etc., click on the inverted triangle inside the Search box > select appropriate filters > click Search button.

Email Feature
Just like other modules, Admissions also has an email function for both Inquiries and Applications forms.
Check out our article Creating Email Templates For Admissions for detailed instructions.
Status Codes
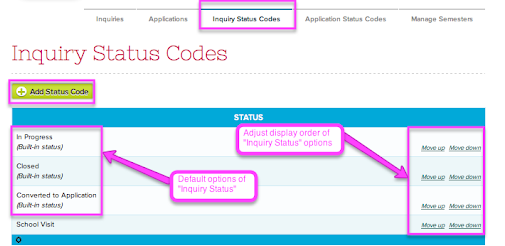
Inquiry/ Application Status Codes denote the state of Student Inquiries providing the ability to see at a glance where each Inquiry is in the process. There are several built-in codes that cannot be modified or deleted. However, you have the ability to add custom Status Codes as needed. These codes are used both in the Student Inquiries/Applications and the available reports.
Access the “Inquiry Status Codes” or "Application Status Codes" tab from the Admissions module.
 Inquiry Status Codes tab
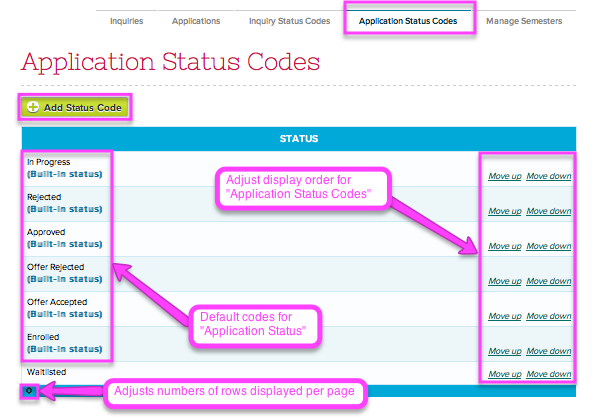
Add Status Codes
To add a code, click “Add Status Code” > Enter new Status Code name > click "Save".
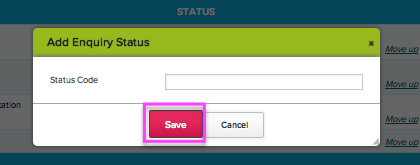
The new inquiry or application status code will display as an option on the forms status field.

Edit/Delete Status Codes
A customized status code may be edited or deleted, but a built-in status code cannot. To edit a status code access the Inquiry / Application Status page > click on the status code to be edited > rename status code > click "Save".
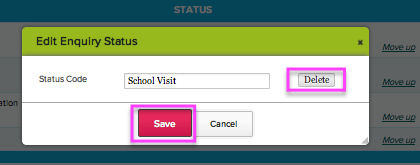
To delete a status code, click on the status code > click Delete button.
Semester Management
You can view and manage the academic year and terms in this tab which is the same as View All Semesters from the New Semester Setup tab.
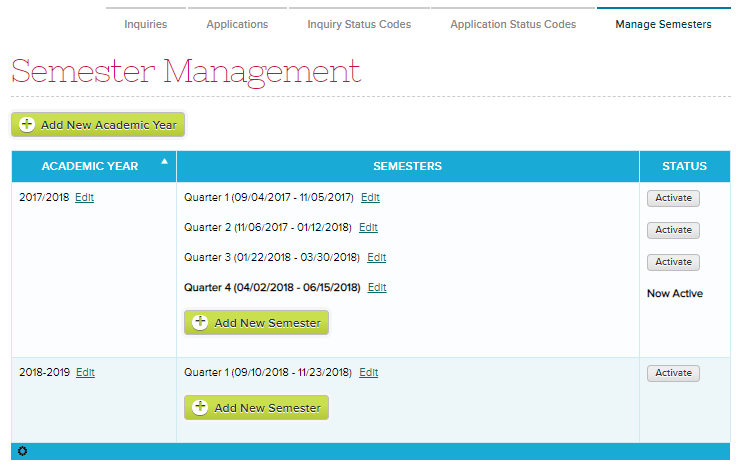
For more information, check out our article on Configuring Semester For The First Time.
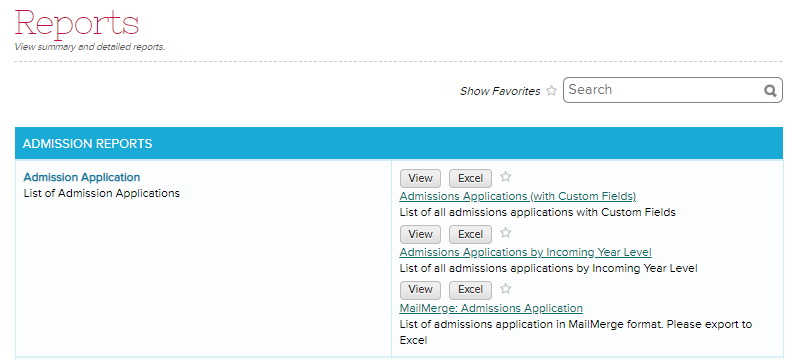
Admissions Reports
Users who have access to Admissions reports can view the available reports via Reports > Summary Reports.
This module is also reportable via Report Creator.
If you would like to embed your forms, read on How To Embed Inquiries And Applications On Your Website.
For more robust forms, we also offer the Online Forms App where PDF forms are supported. Also, check out Admissions Vs. Online Forms for comparison.
19MR0221